Printer Nozzle Check
Run your printer’s own nozzle check from its menu, then tap any broken segments in the reader below. It tells you whether the head is fine, needs one cleaning, needs to rest overnight, or probably has a hardware fault. No printout handy? Print our nozzle grid as a quick first look.
By Online Printer Test PageLast updated
Compare your nozzle check
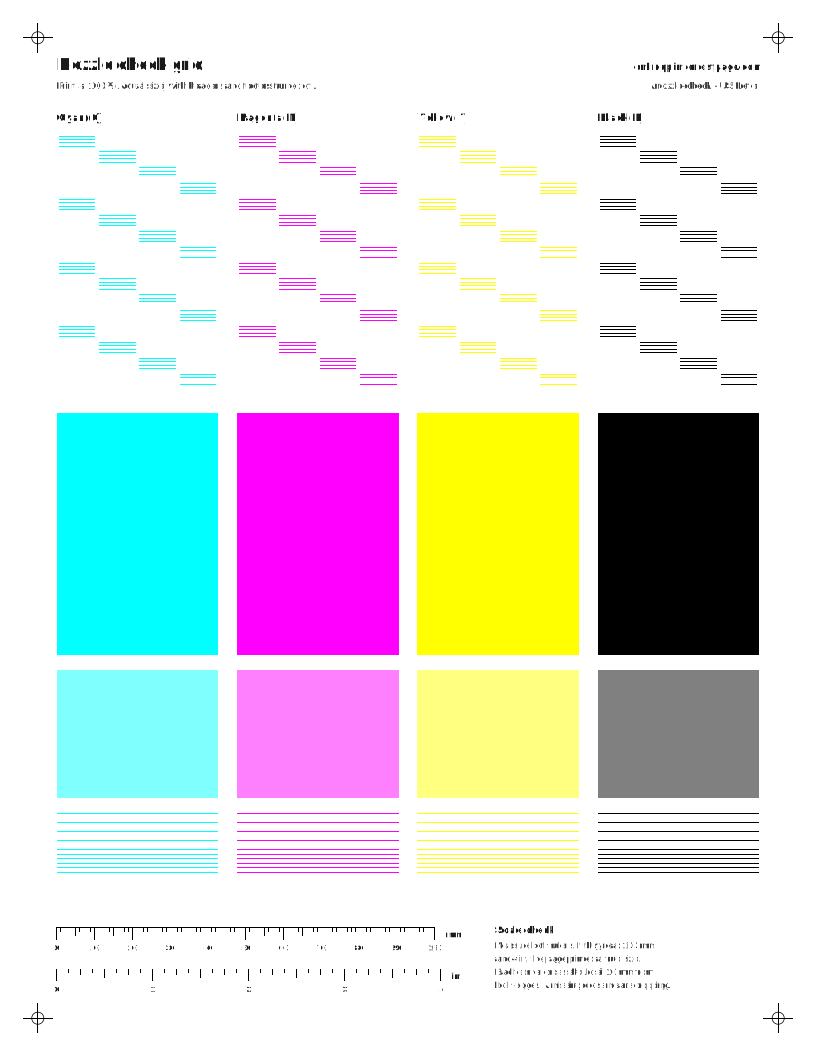
Print your printer’s built-in nozzle check, then tap each segment below that is broken, faint or missing on your printout. Most patterns are a staircase of short lines for each color, like this diagram.
Verdict
Looks clean
No gaps marked. If your printout matches the diagram, the nozzles are firing. No cleaning needed.
0 gaps marked
How we decide: see the rules under “How the reader decides” below. It is a guide, not a diagnosis, and your manual’s limits come first.
Why we start with your printer’s own check
Only the printer can fire each nozzle on purpose. A browser page goes through the driver like any document, so the grid below shows clogs as gaps in fine lines and solid blocks, but it cannot map them to single nozzles.
Printed? How did it look?
- Scale: 100% or Actual size, not Fit to page
- Headers and footers: off
- Paper in the tray matches US Letter
What to look for: nozzle check grid
- Every step of each staircase should be complete. A missing step or broken line points to that ink.
- Thin white lines across a solid block are the classic clogged-nozzle sign.
- For a nozzle-by-nozzle reading, also run your printer’s own nozzle check.
What to look for: cyan test page
- The solid block should be even cyan with no white lines.
- Every step of the ramp should be visible.
- Fine lines should be unbroken.
What to look for: magenta test page
- The solid block should be even magenta with no white lines.
- Every step of the ramp should be visible.
- Fine lines should be unbroken.
What to look for: yellow test page
- The solid block should be even yellow with no white lines.
- Every step of the ramp should be visible.
- Fine lines should be unbroken.
What to look for: black test page
- The solid block should be even black with no white lines.
- Every step of the ramp should be visible.
- Fine lines should be unbroken.
How to run the nozzle check on your printer
Steps are summarized from each maker’s own manuals and support pages, with a link to the source and the date we last checked it. If your model is missing, the closest family usually uses the same menus, but confirm in your manual.
31 model families
Epson EcoTank ET-2400 (no LCD, button-only)ET-2400, EcoTank ET-2400Inkjet
Nozzle check
- Product buttons: press the power button to turn the printer off.
- Load a few sheets of plain paper.
- Hold down the stop button and press the power button to turn the printer on. Release both buttons once it turns on.
- The nozzle check pattern prints. It can take a few seconds; if nothing prints, check that paper is loaded.
- No gaps: the head is clean. Gaps or a faint pattern: clean the print head. Almost the entire pattern missing: run a Power Cleaning.
- Computer utility: load a few sheets of plain paper.
- Open the utility. Windows: right-click the product icon in the right side of the taskbar (click the up arrow first if it is hidden). Mac: Apple menu or Dock > System Preferences > Print & Fax, Print & Scan, or Printers & Scanners > select the product > Options & Supplies > Utility > Open Printer Utility.
- Select Nozzle Check or Print Head Nozzle Check and click Print.
- No gaps: click Finish. Gaps or a faint pattern: clean the print head.
- Almost the entire pattern missing: click Finish and run a Power Cleaning.
Source: ET-2400 User's Guide (CPD-62154), pp.134-139 'Checking the Nozzles Using the Product Buttons' / 'Using a Computer Utility' (files.support.epson.com). Last checked .
Note: The ET-2400 guide gives no control-panel alignment; alignment is done from the computer utility. Cleaning limits: up to 3 cleanings, then turn off and wait at least 12 hours.
Epson EcoTank ET-2720 (small LCD)ET-2720, EcoTank ET-2720Inkjet
Nozzle check
- Control panel: make sure the LCD shows no errors and the output tray is extended.
- Load a few sheets of plain paper.
- Press the home button, if necessary, select Maintenance and press OK.
- Press OK again to select Nozzle Check, then press the start button to print.
- No gaps: select No and press OK. Gaps or a faint pattern: select Yes, press OK, and follow the on-screen cleaning instructions.
- Computer utility: load a few sheets of plain paper.
- Open the utility. Windows: right-click the product icon in the right side of the taskbar (click the up arrow first if it is hidden). Mac: Apple menu or Dock > System Preferences > Print & Fax, Print & Scan, or Printers & Scanners > select the product > Options & Supplies > Utility > Open Printer Utility.
- Select Nozzle Check and click Print.
- No gaps: click Finish. Gaps or a faint pattern: clean the print head.
Source: ET-2720 User's Guide (CPD-56719), pp.139-143 'Checking the Nozzles Using the Product Control Panel' / 'Using a Computer Utility' (files.support.epson.com). Last checked .
Note: Power Cleaning on the ET-2720 uses a power + help button combination with the printer off. Wait at least 12 hours between Power Cleanings.
Epson EcoTank ET-2760 (small LCD)ET-2760, EcoTank ET-2760Inkjet
Nozzle check
- Control panel: make sure the LCD shows no errors and the output tray is extended.
- Load a few sheets of plain paper.
- Press the home button if necessary, select Maintenance and press OK.
- Press OK to select Nozzle Check, then press the start button to print.
- No gaps: select No and press OK. Gaps or a faint pattern: select Yes, press OK, and follow the on-screen cleaning instructions.
- Computer utility: load a few sheets of plain paper.
- Open the utility. Windows: right-click the product icon in the right side of the taskbar (click the up arrow first if it is hidden). Mac: Apple menu or Dock > System Preferences > Print & Fax, Print & Scan, or Printers & Scanners > select the product > Options & Supplies > Utility > Open Printer Utility.
- Select Nozzle Check and click Print.
- No gaps: click Finish. Gaps or a faint pattern: clean the print head.
Source: ET-2760 User's Guide (CPD-57083), pp.152-155 'Checking the Nozzles Using the Product Control Panel' / 'Using a Computer Utility' (files.support.epson.com). Last checked .
Epson EcoTank ET-2800 series (ET-2800/ET-2803, small LCD)ET-2800, ET-2803, EcoTank ET-2800, EcoTank ET-2803Inkjet
Nozzle check
- Control panel: make sure the LCD shows no errors and the output tray is extended.
- Load a few sheets of plain paper.
- Press the home button if necessary, select Maintenance and press OK.
- Press OK again to select Nozzle Check, then press the start button to print.
- No gaps: select No and press OK. Gaps or a faint pattern: select Yes, press OK, and follow the on-screen cleaning instructions. All or most lines missing: select No and run a Power Cleaning.
- Computer utility: load a few sheets of plain paper.
- Open the utility. Windows: right-click the product icon in the right side of the taskbar (click the up arrow first if it is hidden). Mac: Apple menu or Dock > System Preferences or System Settings > Print & Fax, Print & Scan, or Printers & Scanners > select the product > Options & Supplies > Utility > Open Printer Utility.
- Select Nozzle Check or Print Head Nozzle Check and click Print.
- No gaps: click Finish. Gaps or a faint pattern: clean the print head.
- Almost the entire pattern missing: click Finish and run a Power Cleaning.
Source: ET-2800/ET-2803 User's Guide (CPD-60271), pp.159-162 'Checking the Nozzles Using the Product Control Panel' / 'Using a Computer Utility' (files.support.epson.com). Last checked .
Note: Same steps also published as single HTML pages in the online guide (see generalSources). The guide documents no power-on button combination for the nozzle check on this model; use the Maintenance menu.
Epson EcoTank ET-2850 (LCD)ET-2850, EcoTank ET-2850Inkjet
Nozzle check
- Control panel: make sure the LCD shows no errors and the output tray is extended.
- Load a few sheets of plain paper.
- Press the home button if necessary and select Maintenance > Nozzle Check.
- Press the start button to print the pattern.
- No gaps: select No and press OK. Gaps or a faint pattern: select Yes, press OK, and follow the on-screen instructions. Most lines missing: select No, press OK, then run a Power Cleaning.
- Computer utility: load a few sheets of plain paper.
- Open the utility. Windows: right-click the product icon in the right side of the taskbar (click the up arrow first if it is hidden). Mac: Apple menu or Dock > System Preferences > Print & Fax, Print & Scan, or Printers & Scanners > select the product > Options & Supplies > Utility > Open Printer Utility.
- Select Print Head Nozzle Check and click Print.
- No gaps: click Finish. Gaps or a faint pattern: clean the print head.
- Almost the entire pattern missing: click Finish and run a Power Cleaning.
Source: ET-2850 User's Guide (CPD-60206), pp.162-165 'Checking the Nozzles Using the Product Control Panel' / 'Using a Computer Utility' (files.support.epson.com). Last checked .
Epson EcoTank ET-3850 (LCD)ET-3850, EcoTank ET-3850Inkjet
Nozzle check
- Control panel: make sure the LCD shows no errors and the output tray is extended.
- Load a few sheets of plain paper.
- Press the home button if necessary and select Maintenance > Print Head Nozzle Check.
- Select Print.
- No gaps: select O. Gaps or a faint pattern: select X and follow the on-screen cleaning instructions. Almost the entire pattern missing: select O and run a Power Cleaning.
- Computer utility: load a few sheets of plain paper.
- Open the utility. Windows: right-click the product icon in the right side of the taskbar (click the up arrow first if it is hidden). Mac: Apple menu or Dock > System Preferences > Print & Fax, Print & Scan, or Printers & Scanners > select the product > Options & Supplies > Utility > Open Printer Utility.
- Select Print Head Nozzle Check and click Print.
- No gaps: click Finish. Gaps or a faint pattern: clean the print head.
- Almost the entire pattern missing: click Finish and run a Power Cleaning.
Source: ET-3850 User's Guide (CPD-60203), pp.182-186 'Checking the Nozzles Using the Product Control Panel' / 'Using a Computer Utility' (files.support.epson.com). Last checked .
Note: Uses a maintenance box: Power Cleaning can fill it sooner and cannot run if ink or free maintenance-box space is too low.
Epson EcoTank ET-4800 (LCD)ET-4800, EcoTank ET-4800Inkjet
Nozzle check
- Control panel: make sure the LCD shows no errors and the output tray is extended.
- Load a few sheets of plain paper.
- Press the home button if necessary, select Maintenance and press OK.
- Press OK again to select Nozzle Check, then press the start button to print.
- No gaps: select No and press OK. Gaps or a faint pattern: select Yes, press OK, and follow the on-screen cleaning instructions. All or most lines missing: select No and run a Power Cleaning.
- Computer utility: load a few sheets of plain paper.
- Open the utility. Windows: right-click the product icon in the right side of the taskbar (click the up arrow first if it is hidden). Mac: Apple menu or Dock > System Preferences or System Settings > Print & Fax, Print & Scan, or Printers & Scanners > select the product > Options & Supplies > Utility > Open Printer Utility.
- Select Nozzle Check or Print Head Nozzle Check and click Print.
- No gaps: click Finish. Gaps or a faint pattern: clean the print head.
- Almost the entire pattern missing: click Finish and run a Power Cleaning.
Source: ET-4800 User's Guide (CPD-60267), pp.210-214 'Checking the Nozzles Using the Product Control Panel' / 'Using a Computer Utility' (files.support.epson.com). Last checked .
Epson EcoTank Photo ET-8500 / ET-8550 (touchscreen)ET-8500, ET-8550, EcoTank Photo ET-8500, EcoTank Photo ET-8550Inkjet
Nozzle check
- Control panel: make sure the LCD shows no errors and the CD/DVD tray is not inserted.
- Load a few sheets of plain paper in Cassette 2 (lower).
- Select the home icon if necessary, then Maintenance > Print Head Nozzle Check.
- Select Print.
- No gaps: select O. Gaps or a faint pattern: select X and follow the on-screen instructions to clean, re-check, and repeat if needed.
- Computer utility: load plain paper in Cassette 2 (lower) and open the utility (Windows: right-click the product icon in the right side of the taskbar (click the up arrow first if it is hidden). Mac: Apple menu or Dock > System Preferences > Print & Fax, Print & Scan, or Printers & Scanners > select the product > Options & Supplies > Utility > Open Printer Utility.)
- Select Print Head Nozzle Check and click Print. No gaps: click Finish. Gaps or faint: clean the print head.
Source: ET-8500/ET-8550 User's Guide (CPD-59879), pp.232-235 'Checking the Nozzles Using the Product Control Panel' / 'Using a Computer Utility' (files.support.epson.com). Last checked .
Note: Uses a maintenance box. After a Power Cleaning, turn the printer off and wait at least 12 hours before printing another nozzle check or running another cleaning.
Epson Expression Home XP-4100 / XP-4105 (cartridge, LCD)XP-4100, XP-4105, Expression Home XP-4100Inkjet
Nozzle check
- Control panel: load a few sheets of plain paper.
- Press the home button if necessary, then select Maintenance > Print Head Nozzle Check.
- Select Print.
- No gaps: select O. Gaps or a faint pattern: select X and follow the on-screen instructions to clean, re-check, and repeat as needed.
- Computer utility: load a few sheets of plain paper.
- Open the utility. Windows: right-click the product icon in the right side of the taskbar (click the up arrow first if it is hidden). Mac: Apple menu or Dock > System Preferences > Print & Fax, Print & Scan, or Printers & Scanners > select the product > Options & Supplies > Utility > Open Printer Utility.
- Select Nozzle Check and click Print.
- No gaps: click Finish. Gaps or a faint pattern: clean the print head.
Source: XP-4100/XP-4105 User's Guide (CPD-56917), pp.175-180 'Checking the Nozzles Using the Product Control Panel' / 'Using a Computer Utility' (files.support.epson.com). Last checked .
Note: Cartridge model, no Power Cleaning in the guide. Epson's limit here is different from EcoTank models: up to 4 cleanings, then wait at least 6 hours without printing.
Epson Expression Premium XP-6100 (cartridge, LCD)XP-6100, Expression Premium XP-6100Inkjet
Nozzle check
- Control panel: make sure the LCD shows no errors, the CD/DVD tray is not inserted, and the output tray is extended.
- Load a few sheets of plain paper.
- Press the home button if necessary, then select Maintenance > Print Head Nozzle Check.
- Select Print.
- No gaps: select O. Gaps or a faint pattern: select X and follow the on-screen instructions to clean, re-check, and repeat if needed.
- Computer utility: load a few sheets of plain paper.
- Open the utility. Windows: right-click the product icon in the right side of the taskbar (click the up arrow first if it is hidden). Mac: Apple menu or Dock > System Preferences > Print & Fax, Print & Scan, or Printers & Scanners > select the product > Options & Supplies > Utility > Open Printer Utility.
- Select Nozzle Check and click Print.
- No gaps: click Finish. Gaps or a faint pattern: clean the print head.
Source: XP-6100 User's Guide (CPD-56653), pp.241-245 'Checking the Nozzles Using the Product Control Panel' / 'Using a Computer Utility' (files.support.epson.com). Last checked .
Note: Cartridge model, no Power Cleaning in the guide. Limit: up to 3 cleanings, then wait at least 6 hours without printing.
Epson WorkForce WF-2850 (cartridge, LCD)WF-2850, WorkForce WF-2850Inkjet
Nozzle check
- Control panel: make sure the LCD shows no errors and load a few sheets of plain paper.
- Press the home button if necessary, then select Maintenance > Print Head Nozzle Check.
- Select Print.
- No gaps: select O. Gaps or a faint pattern: select X and follow the on-screen instructions to clean, re-check, and repeat as needed.
- Computer utility: load a few sheets of plain paper.
- Open the utility. Windows: right-click the product icon in the right side of the taskbar (click the up arrow first if it is hidden). Mac: Apple menu or Dock > System Preferences > Print & Fax, Print & Scan, or Printers & Scanners > select the product > Options & Supplies > Utility > Open Printer Utility.
- Select Nozzle Check and click Print.
- No gaps: click Finish. Gaps or a faint pattern: clean the print head.
Source: WF-2850 User's Guide (CPD-56932), pp.211-214 'Checking the Nozzles Using the Product Control Panel' / 'Using a Computer Utility' (files.support.epson.com). Last checked .
Note: Cartridge model. Limit: up to 4 cleanings, then wait at least 6 hours without printing. If still poor, a cartridge may be old or damaged.
Epson WorkForce Pro WF-3820 series (cartridge, touchscreen)WF-3820, WorkForce Pro WF-3820, WF-3820DWFInkjet
Nozzle check
- Control panel: make sure the LCD shows no errors and load a few sheets of plain paper.
- Press the home button if necessary, then select Maintenance > Print Head Nozzle Check.
- Select Start.
- No gaps: select O. Gaps or a faint pattern: select X and follow the on-screen instructions to clean, re-check, and repeat as needed.
- Computer utility: load a few sheets of plain paper.
- Open the utility. Windows: right-click the product icon in the right side of the taskbar (click the up arrow first if it is hidden). Mac: Apple menu or Dock > System Preferences > Print & Fax, Print & Scan, or Printers & Scanners > select the product > Options & Supplies > Utility > Open Printer Utility.
- Select Print Head Nozzle Check and click Print.
- No gaps: click Finish. Gaps or a faint pattern: clean the print head.
Source: WF-3820 Series User's Guide (CPD-58812), pp.258-261 'Checking the Nozzles Using the Product Control Panel' / 'Using a Computer Utility' (files.support.epson.com). Last checked .
Note: Also has Settings > Maintenance > Print Quality Adjustment (guide p.267), a guided combined adjustment that prints an alignment sheet. It is not a separate quality report. Limit: up to 4 cleanings, then wait at least 6 hours without printing.
Epson WorkForce Pro WF-4820 / WF-4830 series (cartridge, touchscreen)WF-4830, WF-4820, WorkForce Pro WF-4830, WorkForce Pro WF-4820Inkjet
Nozzle check
- Control panel: make sure the LCD shows no errors and load a few sheets of plain paper.
- Press the home button if necessary, then select Settings > Maintenance > Print Head Nozzle Check.
- Select Start.
- No gaps: select O. Gaps or a faint pattern: select X and follow the on-screen instructions to clean, re-check, and repeat as needed.
- Computer utility: load a few sheets of plain paper.
- Open the utility. Windows: right-click the product icon in the right side of the taskbar (click the up arrow first if it is hidden). Mac: Apple menu or Dock > System Preferences or System Settings > Print & Fax, Print & Scan, or Printers & Scanners > select the product > Options & Supplies > Utility > Open Printer Utility.
- Select Nozzle Check or Print Head Nozzle Check and click Print.
- No gaps: click Finish. Gaps or a faint pattern: clean the print head.
Source: WF-4820/WF-4830 Series User's Guide (CPD-58814), pp.282-285 'Checking the Nozzles Using the Product Control Panel' / 'Using a Computer Utility' (files.support.epson.com). Last checked .
Note: The guide's nozzle-check path starts at Settings > Maintenance while its cleaning and alignment paths start at Maintenance. Both are recorded as printed. Also has Settings > Maintenance > Print Quality Adjustment (p.291), a combined guided adjustment, not a report. Limit: up to 3 cleanings, then turn off and wait at least 12 hours.
Epson SureColor P700 / P900 (photo, touchscreen)SureColor P700, SureColor P900, SC-P700, SC-P900, P700, P900Inkjet
Nozzle check
- Control panel: load a few sheets of plain paper in the rear paper feeder.
- Select the menu icon on the LCD, then Maintenance > Print Head Nozzle Check.
- Select Start.
- No gaps: select O to exit. Gaps or a faint pattern: select X, then Head Cleaning. Almost the entire pattern missing: select X, then Power Cleaning.
- Follow the on-screen instructions to clean, re-check, and repeat as needed.
- Computer utility: load a few sheets of plain paper.
- Open the utility. Windows: right-click the product icon in the right side of the taskbar (click the up arrow first if it is hidden). Mac: Apple menu or Dock > System Preferences or System Settings > Print & Fax, Print & Scan, or Printers & Scanners > select the product > Options & Supplies > Utility > Open Printer Utility.
- Select Nozzle Check or Print Head Nozzle Check and click Print.
- No gaps: click Finish. Gaps or a faint pattern: clean the print head.
- Almost the entire pattern missing: click Finish and run a Power Cleaning.
Source: SureColor P700/P900 User's Guide (CPD-58636), pp.127-130 'Checking the Nozzles Using the Product Control Panel' / 'Using a Computer Utility' (files.support.epson.com). Last checked .
Note: The guide shows the starting LCD icon only as an image, so its name could not be confirmed from the text. Limit: up to 3 cleanings, then turn off with the power button and wait at least 6 hours. After that, run a Power Cleaning.
Epson EcoTank L3210 / L3200 series (no LCD, button-only)L3210, L3200 Series, L3210 Series, EcoTank L3210Inkjet
Nozzle check
- Product buttons: press the power button to turn the printer off.
- Load a few sheets of plain paper.
- Hold down the stop button and press the power button to turn the printer on. Release both buttons once it turns on.
- The nozzle check pattern prints. It can take a few seconds; if nothing prints, check that paper is loaded.
- No gaps: the head is clean. Gaps or faint: clean the print head. Almost the entire pattern missing: run a Power Cleaning.
- Computer utility: load a few sheets of plain paper.
- Open the utility. Windows: right-click the product icon in the right side of the taskbar (click the up arrow first if it is hidden). Mac: Apple menu or Dock > System Preferences > Print & Fax, Print & Scan, or Printers & Scanners > select the product > Options & Supplies > Utility > Open Printer Utility.
- Select Print Head Nozzle Check and click Print.
- No gaps: click Finish. Gaps or a faint pattern: clean the print head.
- Almost the entire pattern missing: click Finish and run a Power Cleaning.
Source: L3210 User's Guide (CPD-60181, Epson America), pp.114-117 'Checking the Nozzles Using the Product Buttons' / 'Using a Computer Utility' (files.support.epson.com). Last checked .
Note: The international guide (L3210 Series/L3200 Series, NPD6449, download.epson-europe.com) gives the same button combination: turn on while holding the stop button and release when the power light flashes. It also says to hold the stop button for 5 seconds to clean. That guide shows button icons rather than names; the stop identification comes from its button table ('Stops the current operation'). USB-only model, so the guide has no network status sheet.
Epson L805 (ink tank photo, no LCD, button-only)L805, L805 SeriesInkjet
Nozzle check
- Product buttons: load A4 plain paper.
- Press the power button to turn the printer off.
- Turn the printer on while holding down the paper button (the button the guide also uses to load and eject paper). Release the buttons when the power light flashes.
- The nozzle check pattern prints. Broken lines or missing segments (the guide's 'NG' example) mean the nozzles may be clogged. No broken lines (the 'OK' example) means no cleaning is needed.
- Windows: open the printer driver window and click Nozzle Check on the Maintenance tab, then follow the on-screen instructions.
- Mac: System Preferences > Printers & Scanners (or Print & Scan, Print & Fax) > select the printer > Options & Supplies > Utility > Open Printer Utility > Nozzle Check.
Source: L805 Series User's Guide (NPD5362-00 EN, Epson Europe), pp.50-51 'Checking and Cleaning the Print Head' (download.epson-europe.com). Last checked .
Note: The PDF shows buttons as icons. Names here come from the guide's button table: one button loads and ejects paper, and button D is held for more than 3 seconds to run head cleaning. The PDF metadata title is 'L805 Series'.
Epson L1300 / L1800 (A3 ink tank, no LCD, button-only)L1800, L1300Inkjet
Nozzle check
- Product buttons: press the power button to turn the printer off.
- Load a few sheets of plain paper.
- Hold down the paper button and press the power button to turn the printer on. Release both buttons once it turns on.
- The nozzle check pattern prints. No gaps: the head is clean. Gaps or a faint pattern: clean the print head.
- Computer utility: Windows: right-click the product icon in the taskbar. Mac: System Preferences > Print & Fax / Print & Scan / Printers & Scanners > select the product > Options & Supplies > Utility > Open Printer Utility.
- Select Nozzle Check and click Print. No gaps: click Finish. Gaps or faint: clean the print head.
Source: L1300/L1800 User's Guide (CPD-40326), p.67 'Checking the Nozzles Using the Product Buttons' / 'Using a Computer Utility' (files.support.epson.com). Last checked .
Note: Older guide (OS X 10.5-10.9 era). USB-only model, so the guide has no network status sheet. Limit: up to 3 cleanings, then turn off and wait at least 12 hours.
Canon PIXMA TS3500 series (TS3520 etc.)TS3520, TS3522, TS3530, TS3550i, TS3551i, TS3500 seriesInkjet
Nozzle check
- Make sure the printer is turned on.
- Load one sheet of A4 or Letter-sized plain paper in the rear tray.
- Press the Setup button until 1 appears on the LCD.
- Press the Black button or the Color button; the nozzle check pattern prints. Do nothing else until printing finishes.
- Examine the pattern: look for missing lines in pattern A and horizontal white streaks in pattern B. If either appears, or any color in pattern A or B does not print (e.g. magenta), clean the print head.
Source: Canon : Inkjet Manuals : TS3500 series : Printing the Nozzle Check Pattern (ij.manual.canon). Last checked .
Note: Two-segment LCD model: functions are selected by pressing Setup until a number appears. Low ink prevents the nozzle check and alignment sheet from printing correctly; replace the low FINE cartridge first.
Canon PIXMA TS6400 series (TS6420)TS6420, TS6420a, TS6400 seriesInkjet
Nozzle check
- Make sure the printer is turned on.
- Load a sheet of A4 or Letter-sized plain paper in the cassette.
- Press the OK button, select Maintenance, then select Nozzle Check.
- Select Yes on the confirmation screen and press the OK button; the pattern prints and two pattern confirmation screens appear on the LCD.
- Select Next and examine the pattern: check pattern C for missing lines and pattern D for horizontal white streaks.
- If both look fine select All A; if either shows problems (or a color is missing) select Also B, then Yes to start cleaning.
Source: Canon : Inkjet Manuals : TS6400 series : Printing the Nozzle Check Pattern (ij.manual.canon). Last checked .
Note: On this model the examine page labels the printed patterns C (lines) and D (streaks); A/B are the on-screen answer choices.
Canon PIXMA TS8300 series (TS8320 etc.)TS8320, TS8322, TS8340, TS8350, TS8351, TS8352, TS8360, TS8370Inkjet
Nozzle check
- Make sure the printer is turned on and load one sheet of A4 or Letter-sized plain paper in the cassette.
- On the HOME screen select Setup, then Maintenance, then Nozzle Check.
- Select Yes; the operation panel opens, the output tray extends and the pattern prints, followed by two pattern confirmation screens.
- Examine the pattern: pattern C for missing lines, pattern D for horizontal white streaks.
- Select All A if both look fine; otherwise (or if a color is missing) select Also B, then Yes to clean.
Source: Canon : PIXMA Manuals : TS8300 series : Printing the Nozzle Check Pattern (ij.manual.canon). Last checked .
Note: Uses individual ink tanks (not FINE cartridges). TS9500 series (TS9520) was not separately verified.
Canon PIXMA MG3600 series (MG3620 etc.)MG3610, MG3620, MG3640, MG3650, MG3660, MG3670, MG3680, MG3600 seriesInkjet
Nozzle check
- Make sure the power is on.
- Load one sheet of A4 or Letter-sized plain paper in the front tray.
- Open the output tray extension, open the paper output tray, then extend the paper output support.
- Hold down the Stop button until the Alarm lamp flashes once, then release it immediately; the pattern prints.
- Examine the pattern: missing lines in pattern A or horizontal white streaks in pattern B mean the print head needs cleaning.
Source: Canon : PIXMA Manuals : MG3600 series : Printing the Nozzle Check Pattern (ij.manual.canon). Last checked .
Note: No-LCD model: functions are chosen by counting Alarm lamp flashes while holding Stop (1 nozzle check, 2 cleaning, 3 deep cleaning, 4 alignment, 6 alignment values).
Canon PIXMA MX920 series (MX922)MX922, MX920 seriesInkjet
Nozzle check
- Make sure the power is on and load A4 or Letter plain paper in the lower cassette.
- Open the paper output tray, extend the output support, and close the inner cover if open.
- Press the MENU button, select Setup and press OK, then select Maintenance and press OK.
- Select Print nozzle check pattern and press OK, then select Yes and press OK; the pattern prints.
- Compare pattern (1) for missing lines and pattern (2) for horizontal white streaks; select All A if both are fine, or Also B and then Yes to start cleaning.
Source: Canon : PIXMA Manuals : MX920 series : Printing the Nozzle Check Pattern (ij.manual.canon). Last checked .
Note: Auto head alignment requires Matte Photo Paper MP-101 or the supplied paper; plain paper is only for manual alignment. The MX920 series manual top page does not list individual model numbers; MX922 is assigned to this series by Canon's series naming.
Canon PIXMA MegaTank G3060 series (G3260 etc.)G3260, G3262, G3060, G3160, G3360, G3460, G3560, G3660Inkjet
Nozzle check
- Make sure the printer is turned on.
- Load one sheet of A4 or Letter-sized plain paper in the rear tray.
- Press the Setup button, use the left/right buttons to select Maintenance, and press OK.
- Select Nozzle check and press OK; the pattern prints.
- Examine it: missing lines in pattern A or horizontal white streaks in pattern B (or a color not printing) mean the print head needs cleaning.
Source: Canon : Inkjet Manuals : G3060 series : Printing the Nozzle Check Pattern (ij.manual.canon). Last checked .
Note: Ink Flush is this series' equivalent of the strongest cleaning; the macOS Remote UI exposes Cleaning, Deep Cleaning and Ink Flush (not named 'System Cleaning'). If Ink Flush does not help, Canon says replacing the print head may resolve the issue.
Canon PIXMA MegaTank G6000 series (G6020 etc.)G6020, G6010, G6011, G6030, G6040, G6045, G6050, G6055Inkjet
Nozzle check
- Make sure the printer is turned on.
- Load a sheet of A4 or Letter-sized plain paper in the cassette.
- Press the Setup button, select Maintenance with the left/right buttons, and press OK.
- Select Nozzle check and press OK; the pattern prints.
- Examine it: missing lines in pattern A or horizontal white streaks in pattern B (or a missing color) mean the print head needs cleaning.
Source: Canon : Inkjet Manuals : G6000 series : Printing the Nozzle Check Pattern (ij.manual.canon). Last checked .
Note: G7000 series (G7020) deep cleaning page shows the same Setup > Maintenance > Deep Cleaning path (about 1 minute; 24-hour retry; do not unplug): https://ij.manual.canon/ij/webmanual/Manual/All/G7000%20series/EN/UG/ug-136.html. Other G7000 procedures were not individually fetched.
Canon PIXMA MegaTank G3000 series (G3200 etc., no LCD)G3000, G3100, G3102, G3200, G3400, G3500, G3600, G3800Inkjet
Nozzle check
- Make sure the printer is turned on.
- Load one sheet of A4 or Letter-sized plain paper in the rear tray.
- Pull out the paper output tray and open the output tray extension.
- Hold down the Stop button until the Alarm lamp flashes once, then release it immediately; the pattern prints.
- Examine it: missing lines in pattern A or horizontal white streaks in pattern B mean the print head needs cleaning.
Source: Canon : PIXMA Manuals : G3000 series : Printing the Nozzle Check Pattern (ij.manual.canon). Last checked .
Note: System Cleaning (computer only) 'consumes an extremely large amount of ink'; before running it, all inks in the chosen group must be at least at the single-dot mark (fill to the upper limit line if Remaining Ink Notification is enabled).
Canon imagePROGRAF / PIXMA PRO-200 seriesPRO-200, PRO-200 seriesInkjet
Nozzle check
- Make sure the printer is turned on.
- Load a sheet of A4 or Letter-sized plain paper in the top feed.
- On the HOME screen select Maintenance, then Nozzle Check.
- Select Yes; the pattern prints and two pattern confirmation screens appear.
- Check for missing lines. If none, select All A; if lines are missing or a color does not print, select Also B, then Yes, and choose the ink group with missing lines to clean.
Source: Canon : imagePROGRAF Manuals : PRO-200 series : Printing the Nozzle Check Pattern (ij.manual.canon). Last checked .
Note: Ink groups: Pattern 1 = PC / M / Y / PM, Pattern 2 = C / BK / LGY / GY.
Canon PIXMA PRO-100SPRO-100S, PRO-100S seriesInkjet
Nozzle check
- Make sure the power is on.
- Load a sheet of A4 or Letter-sized plain paper in the rear tray (the manual feed tray cannot be used).
- Open the paper output tray, pull out the extension, and close the disc tray guide if open.
- Hold down the RESUME/CANCEL button until the POWER lamp flashes twice, then release it immediately; the pattern prints.
- Check for horizontal white streaks: pattern A covers PC/M/Y/PM, pattern B covers C/BK/LGY/GY. Clean the affected group from the computer, or all colors if both show streaks.
Source: Canon : PIXMA Manuals : PRO-100S series : Printing the Nozzle Check Pattern (ij.manual.canon). Last checked .
Note: Deep cleaning is not available from the printer buttons on this model; it is run from the computer. Original PRO-100, PRO-10 and PRO-1000 manuals were not verified.
Brother MFC-J1010DW / MFC-J1170DW inkjet all-in-oneMFC-J1010DW, MFC-J1012DW, MFC-J1170DWInkjet
Nozzle check (Brother calls it Print Quality Check)
- MFC-J1010DW/MFC-J1012DW: press the Ink button.
- Press ▲ or ▼ to select [Impr. PrintQuality] and press OK, then select [Impr. PrintQuality] again and press OK.
- Press ► to print the check sheet, and check the four colour blocks.
- If all lines are clear, press ◄ to select [No] to finish. If lines are missing, press ► to select [Yes].
- For each colour, press ◄ or ► to pick the pattern (1-4) closest to the printout and press OK.
- If cleaning is needed, press ► to start it; afterwards press ► [Yes] and ► again to reprint and recheck the sheet.
- MFC-J1170DW: press [Ink] > [Improve Print Quality] > [Check Print Quality], then [Start]; answer [No]/[Yes] and pick patterns 1-4 on the touchscreen; press [Start] to clean if prompted.
Source: Check the Print Quality (support.brother.com). Last checked .
Note: Brother has no separate 'nozzle check'; its Print Quality Check sheet (Check the Print Quality) contains the nozzle check pattern, so nozzleCheck maps to the same procedure. No Test Print exists on these inkjets; testPage maps to Print Reports (Brother's Reports page lists User Settings, Network Configuration, WLAN Report, fax reports: https://support.brother.com/g/s/id/htmldoc/mfc/cv_mfc1010dw/use/html/GUID-E0E33870-A13E-4BA6-8A91-1B8205912BC0_1.html). Brother warns: do not touch the print head; cleaning uses ink and cleaning too often wastes ink.
Brother MFC-J4335DW / MFC-J4535DW inkjet all-in-oneMFC-J4335DW, MFC-J4345DW, MFC-J4535DWInkjet
Nozzle check (Brother calls it Print Quality Check)
- MFC-J4335DW/MFC-J4345DW: press the Ink button.
- Press ▲ or ▼ to select [Impr. PrintQuality] and press OK, then select [Impr. PrintQuality] again and press OK.
- Press ► to print the check sheet, and check the four colour blocks.
- If all lines are clear, press ◄ to select [No] to finish. If lines are missing, press ► to select [Yes].
- For each colour, press ◄ or ► to pick the pattern (1-4) closest to the printout and press OK.
- If cleaning is needed, press ► to start it; afterwards press ► [Yes] and ► again to reprint and recheck.
- MFC-J4535DW: press [Ink] > [Improve Print Quality] > [Check Print Quality], then [Start]; answer on the touchscreen and press [Start] to clean if prompted.
Source: Check the Print Quality (support.brother.com). Last checked .
Note: nozzleCheck maps to Brother's Check the Print Quality (Print Quality Check sheet with nozzle check pattern). testPage maps to Print Reports (no Test Print on inkjets; User Settings report lists current settings). The X icon used for MFC-J4535DW special cleaning was identified from the guide's icon image (red X).
Brother MFC-J5855DW / MFC-J5955DW inkjet all-in-one (11x17)MFC-J5855DW, MFC-J5955DW, MFC-J5340DWInkjet
Nozzle check (Brother calls it Print Quality Check)
- Press [Ink] > [Improve Print Quality] > [Check Print Quality].
- Press [Start] to print the check sheet, and check the four colour blocks.
- If all lines are clear, press [No], then the Home icon. If lines are missing, press [Yes].
- For each colour, press the number of the pattern (1-4) that best matches the printout.
- If cleaning is needed, press [Start]; afterwards press [Yes] and [Start] to reprint and recheck the sheet.
Source: Check the Print Quality (support.brother.com). Last checked .
Note: The US guide page for this model group shows a single cleaning flow ([Ink] > [Print Head Cleaning] > [Start]) without the Normal/Strong/Strongest choice. These models also have [Ink] > [Print Quality Auto Check] (default On) which detects clogged nozzles and cleans automatically: https://support.brother.com/g/s/id/htmldoc/mfc/cv_mfc5955dw/use/html/GUID-BAFB07B9-4408-42EA-ACD8-BBA52BB4D0A2_1.html. nozzleCheck maps to Check the Print Quality.
Brother INKvestment Tank MFC-J995DW / MFC-J805DW / MFC-J815DWMFC-J995DW, MFC-J995DWXL, MFC-J805DW, MFC-J815DWInkjet
Nozzle check (Brother calls it Print Quality Check)
- MFC-J995DW: press [Settings] > [Maintenance] > [Improve Print Quality] > [Check Print Quality].
- Press [Start] to print the Print Quality Check Sheet, and check the four colour blocks.
- If all lines are clear, press [No], then the Home icon. If lines are missing, press [Yes].
- For each colour, press the number of the pattern (1-4) that best matches the printout.
- If cleaning is needed, press [Start]; afterwards press [Yes] and [Start] to reprint and recheck.
- MFC-J805DW/MFC-J815DW: press Settings, then ▲/▼ to select [General Setup] > [Maintenance] > [Impr. PrintQuality] > [Impr. PrintQuality] (OK each), press ► to print, and answer with ◄/► as prompted.
Source: Check the Print Quality (support.brother.com). Last checked .
Note: Brother USA markets the MFC-J995DW as 'INKvestment Tank Color Inkjet All-in-One Printer' (https://www.brother-usa.com/products/mfcj995dw, now discontinued). On these models Print Quality / Cleaning live under Settings > Maintenance rather than an Ink button. nozzleCheck maps to Check the Print Quality (Print Quality Check Sheet).
HP printers do not use a separate nozzle check. HP’s manuals use the print quality report instead; see HP print quality report steps.
How the reader decides
The verdicts follow the order most printer manuals give, with the counts kept conservative:
- Looks clean: no gaps marked.
- Clean once: gaps marked and fewer than two cleanings run so far (or two, with only a few gaps).
- Check the ink supply: a whole color is missing and fewer than three cleanings run. Empty cartridges, closed tank valves and air in the line cause this more often than clogs.
- Rest overnight: three or more cleanings, or two with many gaps. Epson’s guides we checked say to stop after three or four cleanings and leave the printer off for 6 to 12 hours depending on model. Canon’s say to deep clean after two cleanings and, if that fails, wait 24 hours.
- Likely hardware: gaps remain after at least two cleanings and a long rest.
Your printer’s manual always wins. The exact limits per model, with links to the source pages, are in the model list above and on the print head cleaning page.
What does a bad nozzle check mean?
A few broken lines in one color usually clear with one cleaning. Many missing segments across several colors after weeks of no printing usually mean dried ink, which needs time as much as cleaning. A color that is completely blank is more often an ink supply problem than a clog.
Questions people ask
What does a nozzle check do?
It prints a pattern that fires every nozzle in the print head for each ink. A complete pattern means every nozzle is working. A broken or missing segment shows exactly which color has blocked nozzles.
What should a nozzle check look like?
Every segment of every color should be complete: no breaks, no faint patches and no missing steps. Most Epson patterns are a staircase of short lines per color; Canon prints a line pattern plus color blocks. Compare yours with the diagram in your manual or the reader above.
Why are lines missing in my Epson nozzle check?
Missing lines mean some nozzles did not fire, usually because ink has dried in them or air got into the line. Epson’s guides say to clean and check again, and to stop after a set number of cleanings and leave the printer off for several hours. The limit depends on the model; look it up in the model list on this page.
How do I do a nozzle check on a sublimation printer?
Sublimation printers are usually converted Epson or Sawgrass models, so you run the same nozzle check from the printer’s menu or utility. Print it on plain paper, not transfer paper. Sublimation ink dries faster, so check weekly if you print rarely.
Can a website run my printer’s nozzle check?
No. A web page can only send a normal print job; it cannot tell the printer to fire individual nozzles. That is why the reader on this page is built around your printer’s own nozzle check, and the printable grid is a backup that shows clogs as gaps in fine lines and solid blocks.