Epson Printer Test Page
Print our color test page to check an Epson printer’s output, then run Epson’s nozzle check from the control panel if you see gaps. Find your model below for the exact button presses from Epson’s user guides, including how many cleanings to run before resting the printer and how long to wait.
By Online Printer Test PageLast updated
Printed? How did it look?
- Scale: 100% or Actual size, not Fit to page
- Headers and footers: off
- Paper in the tray matches US Letter
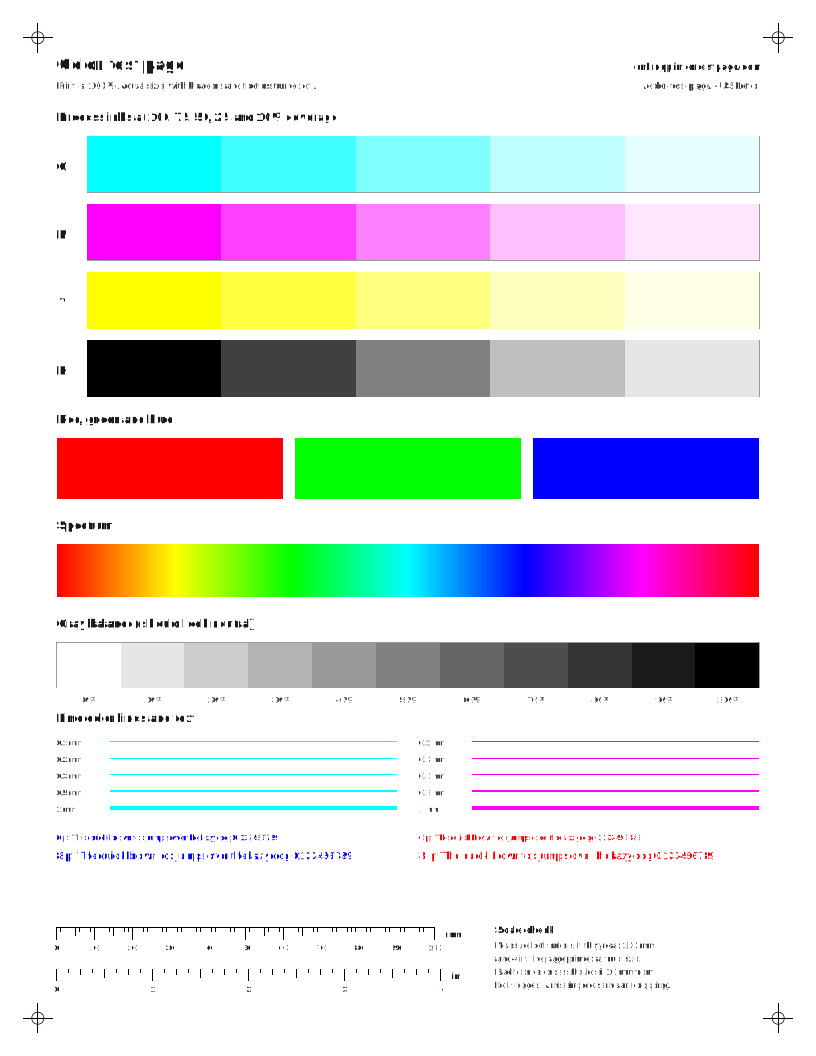
What to look for: color test page
- Each C, M, Y and K row should step evenly from solid to pale. A missing or streaky row points to that ink.
- The gray ramp should look neutral. A pink, green or blue cast means one color is printing weak or strong.
- The spectrum should flow without hard bands or gaps.
What to look for: nozzle check grid
- Every step of each staircase should be complete. A missing step or broken line points to that ink.
- Thin white lines across a solid block are the classic clogged-nozzle sign.
- For a nozzle-by-nozzle reading, also run your printer’s own nozzle check.
What to look for: black and white test page
- The solid black block should be even, with no white lines or streaks.
- You should be able to tell every gray step apart. Steps that merge at the dark end mean heavy ink or toner.
- Small text should be sharp, not fuzzy or doubled.
What to look for: alignment test page
- Vertical lines should be straight and single. Jagged or doubled lines mean the print head needs aligning.
- In the registration crosses, the colored lines should sit on top of each other.
- Diagonals and the circle should be smooth, not stepped.
What to look for: photo test print
- Skin should look natural, not orange, green or gray.
- Smooth areas like cheeks and backgrounds should be free of grain lines.
- Compare the gray ramp with the photo. A cast in both points to color balance, not the photo.
Find your Epson model
Steps are summarized from each maker’s own manuals and support pages, with a link to the source and the date we last checked it. If your model is missing, the closest family usually uses the same menus, but confirm in your manual.
17 model families
EcoTank ET-2400 (no LCD, button-only)ET-2400, EcoTank ET-2400Inkjet
Print a test or status page
- Hold down the network status button for at least 7 seconds to print the network status sheet.
- If you let go before 7 seconds, the printer prints a network connection report instead.
Source: ET-2400 User's Guide (CPD-62154), p.26 'Printing a Network Status Sheet' (files.support.epson.com). Last checked .
Nozzle check
- Product buttons: press the power button to turn the printer off.
- Load a few sheets of plain paper.
- Hold down the stop button and press the power button to turn the printer on. Release both buttons once it turns on.
- The nozzle check pattern prints. It can take a few seconds; if nothing prints, check that paper is loaded.
- No gaps: the head is clean. Gaps or a faint pattern: clean the print head. Almost the entire pattern missing: run a Power Cleaning.
- Computer utility: load a few sheets of plain paper.
- Open the utility. Windows: right-click the product icon in the right side of the taskbar (click the up arrow first if it is hidden). Mac: Apple menu or Dock > System Preferences > Print & Fax, Print & Scan, or Printers & Scanners > select the product > Options & Supplies > Utility > Open Printer Utility.
- Select Nozzle Check or Print Head Nozzle Check and click Print.
- No gaps: click Finish. Gaps or a faint pattern: clean the print head.
- Almost the entire pattern missing: click Finish and run a Power Cleaning.
Source: ET-2400 User's Guide (CPD-62154), pp.134-139 'Checking the Nozzles Using the Product Buttons' / 'Using a Computer Utility' (files.support.epson.com). Last checked .
Cleaning
- Product buttons: make sure no product lights show an error and load a few sheets of plain paper.
- Hold down the stop button for 5 seconds to start the cleaning cycle. The power light flashes during the cycle and stays on when it finishes.
- Never turn the printer off or open the front cover during a cleaning cycle.
- Run a nozzle check to confirm the head is clean.
- Computer utility: load a few sheets of plain paper, open the utility (Windows: right-click the product icon in the right side of the taskbar (click the up arrow first if it is hidden). Mac: Apple menu or Dock > System Preferences > Print & Fax, Print & Scan, or Printers & Scanners > select the product > Options & Supplies > Utility > Open Printer Utility.)
- Select Head Cleaning or Print Head Cleaning and click Start. Do not turn the product off during the cycle.
- When the cycle finishes, click Print Nozzle Check Pattern, then Print.
- No gaps: click Finish. Gaps or faint: click Clean to clean again.
- Almost the entire pattern missing: click Finish and run a Power Cleaning.
- Power Cleaning (computer utility only): make sure each ink tank is at least one-third full, open the utility (Windows: right-click the product icon in the taskbar, select Printer Settings, and click the Maintenance tab. Mac: Open Printer Utility as above), select Power Cleaning and follow the on-screen instructions, then run a nozzle check.
Source: ET-2400 User's Guide (CPD-62154), pp.139-146 'Print Head Cleaning' and 'Power Cleaning Using a Computer Utility' (files.support.epson.com). Last checked .
Alignment
- Load a few sheets of plain paper.
- Open the utility. Windows: right-click the product icon in the right side of the taskbar (click the up arrow first if it is hidden). Mac: Apple menu or Dock > System Preferences > Print & Fax, Print & Scan, or Printers & Scanners > select the product > Options & Supplies > Utility > Open Printer Utility.
- Select Print Head Alignment, click Next, then click Print to print an alignment sheet. Do not cancel while it prints.
- Follow the on-screen instructions to pick the number of the best printed pattern in each set (vertical and horizontal), clicking Next after each.
- If no pattern in a set is aligned, choose the closest one, click Realignment, and print another sheet.
- Click Finish when done.
Source: ET-2400 User's Guide (CPD-62154), pp.146-148 'Aligning the Print Head Using a Computer Utility' (files.support.epson.com). Last checked .
Not listed here: print quality report. We could not confirm these steps in an official source for this family, so check your printer’s manual.
Note: The ET-2400 guide gives no control-panel alignment; alignment is done from the computer utility. Cleaning limits: up to 3 cleanings, then turn off and wait at least 12 hours.
EcoTank ET-2720 (small LCD)ET-2720, EcoTank ET-2720Inkjet
Print a test or status page
- Press the home button, if necessary.
- Select Settings > Network Settings > Print Status Sheet.
- Press the start button to print the network status sheet (press stop to cancel).
Source: ET-2720 User's Guide (CPD-56719), p.41 'Printing a Network Status Sheet' (files.support.epson.com). Last checked .
Nozzle check
- Control panel: make sure the LCD shows no errors and the output tray is extended.
- Load a few sheets of plain paper.
- Press the home button, if necessary, select Maintenance and press OK.
- Press OK again to select Nozzle Check, then press the start button to print.
- No gaps: select No and press OK. Gaps or a faint pattern: select Yes, press OK, and follow the on-screen cleaning instructions.
- Computer utility: load a few sheets of plain paper.
- Open the utility. Windows: right-click the product icon in the right side of the taskbar (click the up arrow first if it is hidden). Mac: Apple menu or Dock > System Preferences > Print & Fax, Print & Scan, or Printers & Scanners > select the product > Options & Supplies > Utility > Open Printer Utility.
- Select Nozzle Check and click Print.
- No gaps: click Finish. Gaps or a faint pattern: clean the print head.
Source: ET-2720 User's Guide (CPD-56719), pp.139-143 'Checking the Nozzles Using the Product Control Panel' / 'Using a Computer Utility' (files.support.epson.com). Last checked .
Cleaning
- Control panel: make sure the LCD shows no errors and the output tray is extended, and load a few sheets of plain paper.
- Press the home button if necessary, select Maintenance and press OK, then select Head Cleaning and press OK.
- Press the start button. The power light flashes during the cycle; never open the inner cover or turn the printer off while it runs.
- Select Nozzle Check, press OK, then press start to confirm the head is clean.
- Computer utility: load a few sheets of plain paper, open the utility (Windows: right-click the product icon in the right side of the taskbar (click the up arrow first if it is hidden). Mac: Apple menu or Dock > System Preferences > Print & Fax, Print & Scan, or Printers & Scanners > select the product > Options & Supplies > Utility > Open Printer Utility.)
- Select Head Cleaning and click Start. Do not turn the product off during the cycle.
- When the cycle finishes, click Print Nozzle Check Pattern, then Print.
- No gaps: click Finish. Gaps or faint: click Clean to clean again.
- Power Cleaning from the control panel: turn the printer off, check that each ink tank is at least one-third full, then hold the power button and the help button together until the Power Cleaning screen appears. Follow the LCD instructions, then run a nozzle check.
- Power Cleaning from a computer: open the utility (Windows: right-click the product icon in the taskbar, select Printer Settings, and click the Maintenance tab.), select Power Cleaning, and follow the on-screen instructions.
Source: ET-2720 User's Guide (CPD-56719), pp.144-151 'Print Head Cleaning' and 'Power Cleaning' (files.support.epson.com). Last checked .
Alignment
- Make sure the LCD shows no errors and the output tray is extended, and load a few sheets of plain paper.
- Press the home button if necessary, select Maintenance and press OK.
- Select Print Head Alignment and press OK, then select Vertical Alignment or Horizontal Alignment and press OK.
- Press the start button to print the alignment sheet. Do not cancel while it prints.
- Use the arrow and OK buttons to enter the number of the most solid printed pattern for each set.
- Press OK when finished.
Source: ET-2720 User's Guide (CPD-56719), pp.152-153 'Aligning the Print Head Using the Product Control Panel' (files.support.epson.com). Last checked .
Not listed here: print quality report. We could not confirm these steps in an official source for this family, so check your printer’s manual.
Note: Power Cleaning on the ET-2720 uses a power + help button combination with the printer off. Wait at least 12 hours between Power Cleanings.
EcoTank ET-2760 (small LCD)ET-2760, EcoTank ET-2760Inkjet
Print a test or status page
- Press the home button, if necessary.
- Use the arrow buttons to select Settings and press OK, then Network Settings and press OK.
- Select Print Status Sheet and press OK.
- Press the start button to print the network status sheet (press stop to cancel).
Source: ET-2760 User's Guide (CPD-57083), pp.38-39 'Printing a Network Status Sheet' (files.support.epson.com). Last checked .
Nozzle check
- Control panel: make sure the LCD shows no errors and the output tray is extended.
- Load a few sheets of plain paper.
- Press the home button if necessary, select Maintenance and press OK.
- Press OK to select Nozzle Check, then press the start button to print.
- No gaps: select No and press OK. Gaps or a faint pattern: select Yes, press OK, and follow the on-screen cleaning instructions.
- Computer utility: load a few sheets of plain paper.
- Open the utility. Windows: right-click the product icon in the right side of the taskbar (click the up arrow first if it is hidden). Mac: Apple menu or Dock > System Preferences > Print & Fax, Print & Scan, or Printers & Scanners > select the product > Options & Supplies > Utility > Open Printer Utility.
- Select Nozzle Check and click Print.
- No gaps: click Finish. Gaps or a faint pattern: clean the print head.
Source: ET-2760 User's Guide (CPD-57083), pp.152-155 'Checking the Nozzles Using the Product Control Panel' / 'Using a Computer Utility' (files.support.epson.com). Last checked .
Cleaning
- Control panel: make sure the LCD shows no errors and the output tray is extended, and load a few sheets of plain paper.
- Press the home button if necessary, select Maintenance and press OK, then select Head Cleaning and press OK.
- Press the start button to clean the head. Never turn the printer off during the cycle.
- Select Nozzle Check, press OK, then press start to confirm the head is clean.
- Computer utility: load a few sheets of plain paper, open the utility (Windows: right-click the product icon in the right side of the taskbar (click the up arrow first if it is hidden). Mac: Apple menu or Dock > System Preferences > Print & Fax, Print & Scan, or Printers & Scanners > select the product > Options & Supplies > Utility > Open Printer Utility.)
- Select Head Cleaning and click Start. Do not turn the product off during the cycle.
- When the cycle finishes, click Print Nozzle Check Pattern, then Print.
- No gaps: click Finish. Gaps or faint: click Clean to clean again.
- Power Cleaning from the control panel: turn the printer off, check that each ink tank is at least one-third full, then hold the power button and the help button together until the Power Cleaning screen appears. Follow the LCD instructions, then run a nozzle check.
- Power Cleaning from a computer: open the utility (Windows: right-click the product icon in the taskbar, select Printer Settings, and click the Maintenance tab.), select Power Cleaning, and follow the on-screen instructions.
Source: ET-2760 User's Guide (CPD-57083), pp.156-162 'Print Head Cleaning' and 'Power Cleaning' (files.support.epson.com). Last checked .
Alignment
- Make sure the LCD shows no errors and the output tray is extended, and load a few sheets of plain paper.
- Press the home button if necessary, select Maintenance and press OK.
- Select Print Head Alignment and press OK, then select Vertical Alignment or Horizontal Alignment and press OK.
- Press OK to print the alignment sheet. Do not cancel while it prints.
- Select the number of the most solid printed pattern for each set on the LCD.
- Press OK when finished.
Source: ET-2760 User's Guide (CPD-57083), pp.163-164 'Aligning the Print Head Using the Product Control Panel' (files.support.epson.com). Last checked .
Not listed here: print quality report. We could not confirm these steps in an official source for this family, so check your printer’s manual.
EcoTank ET-2800 series (ET-2800/ET-2803, small LCD)ET-2800, ET-2803, EcoTank ET-2800, EcoTank ET-2803Inkjet
Print a test or status page
- Press the home button, if necessary.
- Select Settings > Network Settings > Print Status Sheet.
- Press the start button to print the network status sheet (press stop to cancel).
Source: ET-2800/ET-2803 User's Guide (CPD-60271), p.40 'Printing a Network Status Sheet' (files.support.epson.com). Last checked .
Nozzle check
- Control panel: make sure the LCD shows no errors and the output tray is extended.
- Load a few sheets of plain paper.
- Press the home button if necessary, select Maintenance and press OK.
- Press OK again to select Nozzle Check, then press the start button to print.
- No gaps: select No and press OK. Gaps or a faint pattern: select Yes, press OK, and follow the on-screen cleaning instructions. All or most lines missing: select No and run a Power Cleaning.
- Computer utility: load a few sheets of plain paper.
- Open the utility. Windows: right-click the product icon in the right side of the taskbar (click the up arrow first if it is hidden). Mac: Apple menu or Dock > System Preferences or System Settings > Print & Fax, Print & Scan, or Printers & Scanners > select the product > Options & Supplies > Utility > Open Printer Utility.
- Select Nozzle Check or Print Head Nozzle Check and click Print.
- No gaps: click Finish. Gaps or a faint pattern: clean the print head.
- Almost the entire pattern missing: click Finish and run a Power Cleaning.
Source: ET-2800/ET-2803 User's Guide (CPD-60271), pp.159-162 'Checking the Nozzles Using the Product Control Panel' / 'Using a Computer Utility' (files.support.epson.com). Last checked .
Cleaning
- Control panel: make sure the LCD shows no errors and the output tray is extended, and load a few sheets of plain paper.
- Press the home button if necessary, select Maintenance and press OK, then select Head Cleaning and press OK.
- Press the start button. The power light flashes during the cycle; never open the inner cover or turn the printer off while it runs.
- Select Nozzle Check, press OK, then press start to check the result. No gaps: select No and press OK. Gaps or faint: select Yes and press OK. All or most lines missing: select No and run a Power Cleaning.
- Computer utility: load a few sheets of plain paper, open the utility (Windows: right-click the product icon in the right side of the taskbar (click the up arrow first if it is hidden). Mac: Apple menu or Dock > System Preferences or System Settings > Print & Fax, Print & Scan, or Printers & Scanners > select the product > Options & Supplies > Utility > Open Printer Utility.)
- Select Head Cleaning or Print Head Cleaning and click Start. Do not turn the product off during the cycle.
- When the cycle finishes, click Print Nozzle Check Pattern, then Print.
- No gaps: click Finish. Gaps or faint: click Clean to clean again.
- Almost the entire pattern missing: click Finish and run a Power Cleaning.
- Power Cleaning from the control panel: check that each ink tank is at least one-third full, load plain paper, press home if necessary, select Maintenance and press OK, select Power Cleaning and press OK, follow the LCD instructions, then run a nozzle check.
- Power Cleaning from a computer: open the utility (Windows: right-click the product icon in the taskbar, select Printer Settings, and click the Maintenance tab.), select Power Cleaning, and follow the on-screen instructions.
Source: ET-2800/ET-2803 User's Guide (CPD-60271), pp.164-174 'Print Head Cleaning' and 'Power Cleaning' (files.support.epson.com). Last checked .
Alignment
- Make sure the LCD shows no errors and the output tray is extended, and load a few sheets of plain paper.
- Press the home button if necessary, select Maintenance and press OK.
- Select Print Head Alignment and press OK, then select Vertical Alignment or Horizontal Alignment and press OK.
- Press the start button to print the alignment sheet. Do not cancel while it prints.
- Use the arrow and OK buttons to select the number of the most solid printed pattern for each set.
- Press OK when finished.
Source: ET-2800/ET-2803 User's Guide (CPD-60271), pp.175-177 'Aligning the Print Head Using the Product Control Panel' (files.support.epson.com). Last checked .
Not listed here: print quality report. We could not confirm these steps in an official source for this family, so check your printer’s manual.
Note: Same steps also published as single HTML pages in the online guide (see generalSources). The guide documents no power-on button combination for the nozzle check on this model; use the Maintenance menu.
EcoTank ET-2850 (LCD)ET-2850, EcoTank ET-2850Inkjet
Print a test or status page
- Press the home button, if necessary.
- Select Settings > Network Settings > Print Status Sheet.
- Press the start button to print the network status sheet (press stop to cancel).
Source: ET-2850 User's Guide (CPD-60206), p.37 'Printing a Network Status Sheet' (files.support.epson.com). Last checked .
Nozzle check
- Control panel: make sure the LCD shows no errors and the output tray is extended.
- Load a few sheets of plain paper.
- Press the home button if necessary and select Maintenance > Nozzle Check.
- Press the start button to print the pattern.
- No gaps: select No and press OK. Gaps or a faint pattern: select Yes, press OK, and follow the on-screen instructions. Most lines missing: select No, press OK, then run a Power Cleaning.
- Computer utility: load a few sheets of plain paper.
- Open the utility. Windows: right-click the product icon in the right side of the taskbar (click the up arrow first if it is hidden). Mac: Apple menu or Dock > System Preferences > Print & Fax, Print & Scan, or Printers & Scanners > select the product > Options & Supplies > Utility > Open Printer Utility.
- Select Print Head Nozzle Check and click Print.
- No gaps: click Finish. Gaps or a faint pattern: clean the print head.
- Almost the entire pattern missing: click Finish and run a Power Cleaning.
Source: ET-2850 User's Guide (CPD-60206), pp.162-165 'Checking the Nozzles Using the Product Control Panel' / 'Using a Computer Utility' (files.support.epson.com). Last checked .
Cleaning
- Control panel: make sure the LCD shows no errors and the output tray is extended, and load a few sheets of plain paper.
- Press the home button if necessary and select Maintenance > Head Cleaning.
- Press the start button. When the cycle finishes a nozzle pattern prints automatically. Never turn the printer off or open the scanner unit during the cycle.
- No gaps: select No and press OK. Gaps or faint: select Yes and press OK. Almost the entire pattern missing: select No, press OK, then run a Power Cleaning.
- Computer utility: load a few sheets of plain paper, open the utility (Windows: right-click the product icon in the right side of the taskbar (click the up arrow first if it is hidden). Mac: Apple menu or Dock > System Preferences > Print & Fax, Print & Scan, or Printers & Scanners > select the product > Options & Supplies > Utility > Open Printer Utility.)
- Select Print Head Cleaning and click Start. Do not turn the product off during the cycle.
- When the cycle finishes, click Print Nozzle Check Pattern, then Print.
- No gaps: click Finish. Gaps or faint: click Clean to clean again.
- Almost the entire pattern missing: click Finish and run a Power Cleaning.
- Power Cleaning from the control panel: check that each ink tank is at least one-third full, press home if necessary, select Maintenance > Power Cleaning, follow the LCD instructions, then run a nozzle check.
- Power Cleaning from a computer: open the utility (Windows: right-click the product icon in the taskbar, select Printer Settings, and click the Maintenance tab.), select Power Cleaning, and follow the on-screen instructions.
Source: ET-2850 User's Guide (CPD-60206), pp.166-174 'Print Head Cleaning' and 'Power Cleaning' (files.support.epson.com). Last checked .
Alignment
- Make sure the LCD shows no errors and the output tray is extended, and load a few sheets of plain paper.
- Press the home button if necessary and select Maintenance > Print Head Alignment.
- Select Vertical Alignment or Horizontal Alignment and press OK.
- Press the start button to print the alignment sheet. Do not cancel while it prints.
- Select the number of the most solid printed pattern for each set on the LCD.
- Press OK when finished.
Source: ET-2850 User's Guide (CPD-60206), pp.175-176 'Aligning the Print Head Using the Product Control Panel' (files.support.epson.com). Last checked .
Not listed here: print quality report. We could not confirm these steps in an official source for this family, so check your printer’s manual.
EcoTank ET-3850 (LCD)ET-3850, EcoTank ET-3850Inkjet
Print a test or status page
- Press the home button, if necessary.
- Select Settings > General Settings > Network Settings > Network Status.
- Select Print Status Sheet.
- Press the start button to print the status sheet.
Source: ET-3850 User's Guide (CPD-60203), p.43 'Printing a Network Status Sheet' (files.support.epson.com). Last checked .
Nozzle check
- Control panel: make sure the LCD shows no errors and the output tray is extended.
- Load a few sheets of plain paper.
- Press the home button if necessary and select Maintenance > Print Head Nozzle Check.
- Select Print.
- No gaps: select O. Gaps or a faint pattern: select X and follow the on-screen cleaning instructions. Almost the entire pattern missing: select O and run a Power Cleaning.
- Computer utility: load a few sheets of plain paper.
- Open the utility. Windows: right-click the product icon in the right side of the taskbar (click the up arrow first if it is hidden). Mac: Apple menu or Dock > System Preferences > Print & Fax, Print & Scan, or Printers & Scanners > select the product > Options & Supplies > Utility > Open Printer Utility.
- Select Print Head Nozzle Check and click Print.
- No gaps: click Finish. Gaps or a faint pattern: clean the print head.
- Almost the entire pattern missing: click Finish and run a Power Cleaning.
Source: ET-3850 User's Guide (CPD-60203), pp.182-186 'Checking the Nozzles Using the Product Control Panel' / 'Using a Computer Utility' (files.support.epson.com). Last checked .
Cleaning
- Control panel: make sure the LCD shows no errors and the output tray is extended, and load a few sheets of plain paper.
- Press the home button if necessary and select Maintenance > Print Head Cleaning.
- Press OK to start. When the cycle finishes a nozzle pattern prints. Never turn the printer off or open the scanner unit during the cycle.
- No gaps: select O. Gaps or faint: select X and follow the on-screen instructions. Almost the entire pattern missing: select O and run a Power Cleaning.
- Computer utility: load a few sheets of plain paper, open the utility (Windows: right-click the product icon in the right side of the taskbar (click the up arrow first if it is hidden). Mac: Apple menu or Dock > System Preferences > Print & Fax, Print & Scan, or Printers & Scanners > select the product > Options & Supplies > Utility > Open Printer Utility.)
- Select Print Head Cleaning and click Start. Do not turn the product off during the cycle.
- When the cycle finishes, click Print Nozzle Check Pattern, then Print.
- No gaps: click Finish. Gaps or faint: click Clean to clean again.
- Almost the entire pattern missing: click Finish and run a Power Cleaning.
- Power Cleaning from the control panel: check that each ink tank is at least one-third full, press home if necessary, select Maintenance > Power Cleaning, follow the on-screen instructions, select OK on the confirmation screen, then run a nozzle check.
- Power Cleaning from a computer: open the utility (Windows: right-click the product icon in the taskbar, select Printer Settings, and click the Maintenance tab.), select Power Cleaning, and follow the on-screen instructions.
Source: ET-3850 User's Guide (CPD-60203), pp.187-195 'Print Head Cleaning' and 'Power Cleaning' (files.support.epson.com). Last checked .
Alignment
- Make sure the LCD shows no errors and the output tray is extended, and load a few sheets of plain paper.
- Press the home button if necessary and select Maintenance > Print Head Alignment.
- Select Vertical Alignment or Horizontal Alignment.
- Press OK to print the alignment sheet. Do not cancel while it prints.
- Select the number of the most solid printed pattern for each set on the LCD.
- Press OK when finished.
Source: ET-3850 User's Guide (CPD-60203), pp.196-197 'Aligning the Print Head Using the Product Control Panel' (files.support.epson.com). Last checked .
Not listed here: print quality report. We could not confirm these steps in an official source for this family, so check your printer’s manual.
Note: Uses a maintenance box: Power Cleaning can fill it sooner and cannot run if ink or free maintenance-box space is too low.
EcoTank ET-4800 (LCD)ET-4800, EcoTank ET-4800Inkjet
Print a test or status page
- Press the home button, if necessary.
- Select Settings > Network Settings > Print Status Sheet.
- Press the start button to print the network status sheet (press stop to cancel).
Source: ET-4800 User's Guide (CPD-60267), p.46 'Printing a Network Status Sheet' (files.support.epson.com). Last checked .
Nozzle check
- Control panel: make sure the LCD shows no errors and the output tray is extended.
- Load a few sheets of plain paper.
- Press the home button if necessary, select Maintenance and press OK.
- Press OK again to select Nozzle Check, then press the start button to print.
- No gaps: select No and press OK. Gaps or a faint pattern: select Yes, press OK, and follow the on-screen cleaning instructions. All or most lines missing: select No and run a Power Cleaning.
- Computer utility: load a few sheets of plain paper.
- Open the utility. Windows: right-click the product icon in the right side of the taskbar (click the up arrow first if it is hidden). Mac: Apple menu or Dock > System Preferences or System Settings > Print & Fax, Print & Scan, or Printers & Scanners > select the product > Options & Supplies > Utility > Open Printer Utility.
- Select Nozzle Check or Print Head Nozzle Check and click Print.
- No gaps: click Finish. Gaps or a faint pattern: clean the print head.
- Almost the entire pattern missing: click Finish and run a Power Cleaning.
Source: ET-4800 User's Guide (CPD-60267), pp.210-214 'Checking the Nozzles Using the Product Control Panel' / 'Using a Computer Utility' (files.support.epson.com). Last checked .
Cleaning
- Control panel: make sure the LCD shows no errors and the output tray is extended, and load a few sheets of plain paper.
- Press the home button if necessary, select Maintenance and press OK, then select Head Cleaning and press OK.
- Press the start button. Never open the inner cover or turn the printer off during the cycle.
- Select Nozzle Check, press OK, then press start to check the result. No gaps: select No. Gaps or faint: select Yes. All or most lines missing: select No and run a Power Cleaning.
- Computer utility: load a few sheets of plain paper, open the utility (Windows: right-click the product icon in the right side of the taskbar (click the up arrow first if it is hidden). Mac: Apple menu or Dock > System Preferences or System Settings > Print & Fax, Print & Scan, or Printers & Scanners > select the product > Options & Supplies > Utility > Open Printer Utility.)
- Select Head Cleaning or Print Head Cleaning and click Start. Do not turn the product off during the cycle.
- When the cycle finishes, click Print Nozzle Check Pattern, then Print.
- No gaps: click Finish. Gaps or faint: click Clean to clean again.
- Almost the entire pattern missing: click Finish and run a Power Cleaning.
- Power Cleaning from the control panel: check that each ink tank is at least one-third full, load plain paper, press home if necessary, select Maintenance and press OK, select Power Cleaning and press OK, follow the LCD instructions, then run a nozzle check.
- Power Cleaning from a computer: open the utility (Windows: right-click the product icon in the taskbar, select Printer Settings, and click the Maintenance tab.), select Power Cleaning, and follow the on-screen instructions.
Source: ET-4800 User's Guide (CPD-60267), pp.215-225 'Print Head Cleaning' and 'Power Cleaning' (files.support.epson.com). Last checked .
Alignment
- Make sure the LCD shows no errors and the output tray is extended, and load a few sheets of plain paper.
- Press the home button if necessary, select Maintenance and press OK.
- Select Print Head Alignment and press OK, then select Vertical Alignment or Horizontal Alignment and press OK.
- Press the start button to print the alignment sheet. Do not cancel while it prints.
- Use the arrow and OK buttons to select the number of the most solid printed pattern for each set.
- Press OK when finished.
Source: ET-4800 User's Guide (CPD-60267), pp.226-227 'Aligning the Print Head Using the Product Control Panel' (files.support.epson.com). Last checked .
Not listed here: print quality report. We could not confirm these steps in an official source for this family, so check your printer’s manual.
EcoTank Photo ET-8500 / ET-8550 (touchscreen)ET-8500, ET-8550, EcoTank Photo ET-8500, EcoTank Photo ET-8550Inkjet
Print a test or status page
- Make sure a few sheets of plain paper are loaded in the cassette.
- Select the home icon, if necessary.
- Select Settings > Network Settings > Network Status > Print Status Sheet.
- Select Print.
Source: ET-8500/ET-8550 User's Guide (CPD-59879), p.47 'Printing a Network Status Sheet' (files.support.epson.com). Last checked .
Nozzle check
- Control panel: make sure the LCD shows no errors and the CD/DVD tray is not inserted.
- Load a few sheets of plain paper in Cassette 2 (lower).
- Select the home icon if necessary, then Maintenance > Print Head Nozzle Check.
- Select Print.
- No gaps: select O. Gaps or a faint pattern: select X and follow the on-screen instructions to clean, re-check, and repeat if needed.
- Computer utility: load plain paper in Cassette 2 (lower) and open the utility (Windows: right-click the product icon in the right side of the taskbar (click the up arrow first if it is hidden). Mac: Apple menu or Dock > System Preferences > Print & Fax, Print & Scan, or Printers & Scanners > select the product > Options & Supplies > Utility > Open Printer Utility.)
- Select Print Head Nozzle Check and click Print. No gaps: click Finish. Gaps or faint: clean the print head.
Source: ET-8500/ET-8550 User's Guide (CPD-59879), pp.232-235 'Checking the Nozzles Using the Product Control Panel' / 'Using a Computer Utility' (files.support.epson.com). Last checked .
Cleaning
- Control panel: make sure the LCD shows no errors and the CD/DVD tray is not inserted, and load plain paper in Cassette 2 (lower).
- Select the home icon if necessary, then Maintenance > Print Head Cleaning.
- Select Start. When the cycle finishes a nozzle pattern prints. Never turn the printer off or open the scanner unit during the cycle.
- No gaps: select O. Gaps or faint: select X and follow the on-screen instructions.
- Computer utility: load a few sheets of plain paper, open the utility (Windows: right-click the product icon in the right side of the taskbar (click the up arrow first if it is hidden). Mac: Apple menu or Dock > System Preferences > Print & Fax, Print & Scan, or Printers & Scanners > select the product > Options & Supplies > Utility > Open Printer Utility.)
- Select Print Head Cleaning and click Start. Do not turn the product off during the cycle.
- When the cycle finishes, click Print Nozzle Check Pattern, then Print.
- No gaps: click Finish. Gaps or faint: click Clean to clean again.
- Power Cleaning (control panel): check that each ink tank is at least one-third full, load plain paper in Cassette 2, select Maintenance > Power Cleaning, and follow the on-screen instructions. A nozzle check pattern prints at the end.
Source: ET-8500/ET-8550 User's Guide (CPD-59879), pp.236-243 'Print Head Cleaning' and 'Power Cleaning Using the Product Control Panel' (files.support.epson.com). Last checked .
Alignment
- Make sure the LCD shows no errors and the CD/DVD tray is not inserted, and load plain paper in Cassette 2 (lower).
- Select the home icon if necessary, then Maintenance > Print Head Alignment.
- Choose Vertical Alignment (blurry prints or misaligned vertical ruled lines) or Horizontal Alignment (horizontal banding).
- Follow the on-screen instructions to print the alignment sheet. Do not cancel while it prints.
- Vertical: for each set, select the number of the pattern with the least separation or overlap. Horizontal: select the number of the pattern with the least separation or overlap.
- Follow the remaining on-screen instructions to finish.
Source: ET-8500/ET-8550 User's Guide (CPD-59879), pp.240-241 'Aligning the Print Head Using the Product Control Panel' (files.support.epson.com). Last checked .
Not listed here: print quality report. We could not confirm these steps in an official source for this family, so check your printer’s manual.
Note: Uses a maintenance box. After a Power Cleaning, turn the printer off and wait at least 12 hours before printing another nozzle check or running another cleaning.
Expression Home XP-4100 / XP-4105 (cartridge, LCD)XP-4100, XP-4105, Expression Home XP-4100Inkjet
Print a test or status page
- Press the home button, if necessary.
- Select Settings > Network Settings > Network Status > Print Status Sheet.
- Press the start button to print the status sheet.
Source: XP-4100/XP-4105 User's Guide (CPD-56917), p.45 'Printing a Network Status Sheet' (files.support.epson.com). Last checked .
Nozzle check
- Control panel: load a few sheets of plain paper.
- Press the home button if necessary, then select Maintenance > Print Head Nozzle Check.
- Select Print.
- No gaps: select O. Gaps or a faint pattern: select X and follow the on-screen instructions to clean, re-check, and repeat as needed.
- Computer utility: load a few sheets of plain paper.
- Open the utility. Windows: right-click the product icon in the right side of the taskbar (click the up arrow first if it is hidden). Mac: Apple menu or Dock > System Preferences > Print & Fax, Print & Scan, or Printers & Scanners > select the product > Options & Supplies > Utility > Open Printer Utility.
- Select Nozzle Check and click Print.
- No gaps: click Finish. Gaps or a faint pattern: clean the print head.
Source: XP-4100/XP-4105 User's Guide (CPD-56917), pp.175-180 'Checking the Nozzles Using the Product Control Panel' / 'Using a Computer Utility' (files.support.epson.com). Last checked .
Cleaning
- Control panel: load a few sheets of plain paper.
- Press the home button if necessary, then select Maintenance > Print Head Cleaning.
- Select Start. Never turn the printer off or open the scanner unit during the cycle.
- When the finished message appears, select Check, then Print, to print a nozzle check pattern.
- Computer utility: load a few sheets of plain paper, open the utility (Windows: right-click the product icon in the right side of the taskbar (click the up arrow first if it is hidden). Mac: Apple menu or Dock > System Preferences > Print & Fax, Print & Scan, or Printers & Scanners > select the product > Options & Supplies > Utility > Open Printer Utility.)
- Select Head Cleaning and click Start. Do not turn the product off during the cycle.
- When the cycle finishes, click Print Nozzle Check Pattern, then Print.
- No gaps: click Finish. Gaps or faint: click Clean to clean again.
Source: XP-4100/XP-4105 User's Guide (CPD-56917), pp.181-184 'Cleaning the Print Head Using the Product Control Panel' / 'Using a Computer Utility' (files.support.epson.com). Last checked .
Alignment
- Load a few sheets of plain paper.
- Press the home button if necessary, then select Maintenance > Print Head Alignment.
- For misaligned vertical lines or blurry prints: select Vertical Alignment, follow the on-screen instructions to print the sheet, and for each set select the pattern with the least separation or overlap.
- For horizontal banding: select Horizontal Alignment, print the sheet, and select the pattern with the least separation or overlap.
- Follow the remaining on-screen instructions to finish.
Source: XP-4100/XP-4105 User's Guide (CPD-56917), pp.185-186 'Aligning the Print Head Using the Product Control Panel' (files.support.epson.com). Last checked .
Not listed here: print quality report. We could not confirm these steps in an official source for this family, so check your printer’s manual.
Note: Cartridge model, no Power Cleaning in the guide. Epson's limit here is different from EcoTank models: up to 4 cleanings, then wait at least 6 hours without printing.
Expression Premium XP-6100 (cartridge, LCD)XP-6100, Expression Premium XP-6100Inkjet
Print a test or status page
- Make sure a few sheets of plain paper are loaded in the cassette.
- Press the home button, if necessary.
- Select Settings > Network Settings > Network Status > Print Status Sheet.
- Press the start button to print the status sheet.
Source: XP-6100 User's Guide (CPD-56653), p.50 'Printing a Network Status Sheet' (files.support.epson.com). Last checked .
Nozzle check
- Control panel: make sure the LCD shows no errors, the CD/DVD tray is not inserted, and the output tray is extended.
- Load a few sheets of plain paper.
- Press the home button if necessary, then select Maintenance > Print Head Nozzle Check.
- Select Print.
- No gaps: select O. Gaps or a faint pattern: select X and follow the on-screen instructions to clean, re-check, and repeat if needed.
- Computer utility: load a few sheets of plain paper.
- Open the utility. Windows: right-click the product icon in the right side of the taskbar (click the up arrow first if it is hidden). Mac: Apple menu or Dock > System Preferences > Print & Fax, Print & Scan, or Printers & Scanners > select the product > Options & Supplies > Utility > Open Printer Utility.
- Select Nozzle Check and click Print.
- No gaps: click Finish. Gaps or a faint pattern: clean the print head.
Source: XP-6100 User's Guide (CPD-56653), pp.241-245 'Checking the Nozzles Using the Product Control Panel' / 'Using a Computer Utility' (files.support.epson.com). Last checked .
Cleaning
- Control panel: make sure the LCD shows no errors, the CD/DVD tray is not inserted, and the output tray is extended, and load plain paper.
- Press the home button if necessary, then select Maintenance > Print Head Cleaning.
- Select Start. Never turn the printer off or open the scanner unit during the cycle.
- Select Check, then Print, to print a nozzle check pattern. No gaps: select O. Gaps or faint: select X and follow the on-screen instructions.
- Computer utility: load a few sheets of plain paper, open the utility (Windows: right-click the product icon in the right side of the taskbar (click the up arrow first if it is hidden). Mac: Apple menu or Dock > System Preferences > Print & Fax, Print & Scan, or Printers & Scanners > select the product > Options & Supplies > Utility > Open Printer Utility.)
- Select Head Cleaning and click Start. Do not turn the product off during the cycle.
- When the cycle finishes, click Print Nozzle Check Pattern, then Print.
- No gaps: click Finish. Gaps or faint: click Clean to clean again.
Source: XP-6100 User's Guide (CPD-56653), pp.246-250 'Cleaning the Print Head Using the Product Control Panel' / 'Using a Computer Utility' (files.support.epson.com). Last checked .
Alignment
- Make sure the LCD shows no errors, the CD/DVD tray is not inserted, and the output tray is extended, and load plain paper.
- Press the home button if necessary, then select Maintenance > Print Head Alignment.
- Choose Vertical Alignment (blurry prints or misaligned vertical ruled lines) or Horizontal Alignment (horizontal banding).
- Follow the on-screen instructions to print the alignment sheet. Do not cancel while it prints.
- For each set, select the number of the pattern with the least separation or overlap, then follow the remaining on-screen instructions.
Source: XP-6100 User's Guide (CPD-56653), pp.251-252 'Aligning the Print Head Using the Product Control Panel' (files.support.epson.com). Last checked .
Not listed here: print quality report. We could not confirm these steps in an official source for this family, so check your printer’s manual.
Note: Cartridge model, no Power Cleaning in the guide. Limit: up to 3 cleanings, then wait at least 6 hours without printing.
WorkForce WF-2850 (cartridge, LCD)WF-2850, WorkForce WF-2850Inkjet
Print a test or status page
- Make sure a few sheets of plain paper are loaded.
- Press the home button, if necessary.
- Select Settings > General Settings > Network Settings > Network Status > Print Status Sheet.
- Press the start button to print the status sheet.
Source: WF-2850 User's Guide (CPD-56932), p.49 'Printing a Network Status Sheet' (files.support.epson.com). Last checked .
Nozzle check
- Control panel: make sure the LCD shows no errors and load a few sheets of plain paper.
- Press the home button if necessary, then select Maintenance > Print Head Nozzle Check.
- Select Print.
- No gaps: select O. Gaps or a faint pattern: select X and follow the on-screen instructions to clean, re-check, and repeat as needed.
- Computer utility: load a few sheets of plain paper.
- Open the utility. Windows: right-click the product icon in the right side of the taskbar (click the up arrow first if it is hidden). Mac: Apple menu or Dock > System Preferences > Print & Fax, Print & Scan, or Printers & Scanners > select the product > Options & Supplies > Utility > Open Printer Utility.
- Select Nozzle Check and click Print.
- No gaps: click Finish. Gaps or a faint pattern: clean the print head.
Source: WF-2850 User's Guide (CPD-56932), pp.211-214 'Checking the Nozzles Using the Product Control Panel' / 'Using a Computer Utility' (files.support.epson.com). Last checked .
Cleaning
- Control panel: make sure the LCD shows no errors and load a few sheets of plain paper.
- Press the home button if necessary, then select Maintenance > Print Head Cleaning.
- Select Start. Never turn the printer off or open the front cover during the cycle.
- Select Check, then Print, to confirm the head is clean, and follow the on-screen instructions to repeat if needed.
- Computer utility: load a few sheets of plain paper, open the utility (Windows: right-click the product icon in the right side of the taskbar (click the up arrow first if it is hidden). Mac: Apple menu or Dock > System Preferences > Print & Fax, Print & Scan, or Printers & Scanners > select the product > Options & Supplies > Utility > Open Printer Utility.)
- Select Head Cleaning and click Start. Do not turn the product off during the cycle.
- When the cycle finishes, click Print Nozzle Check Pattern, then Print.
- No gaps: click Finish. Gaps or faint: click Clean to clean again.
Source: WF-2850 User's Guide (CPD-56932), pp.215-217 'Cleaning the Print Head Using the Product Control Panel' / 'Using a Computer Utility' (files.support.epson.com). Last checked .
Alignment
- Make sure the LCD shows no errors and load a few sheets of plain paper.
- Press the home button if necessary, then select Maintenance > Print Head Alignment.
- Choose Vertical Alignment (blurry prints) or Horizontal Alignment (horizontal banding).
- Follow the on-screen instructions to print the alignment sheet. Do not cancel while it prints.
- Select the number of the pattern with the least separation or overlap.
- Select Dismiss.
Source: WF-2850 User's Guide (CPD-56932), pp.218-219 'Aligning the Print Head Using the Product Control Panel' (files.support.epson.com). Last checked .
Not listed here: print quality report. We could not confirm these steps in an official source for this family, so check your printer’s manual.
Note: Cartridge model. Limit: up to 4 cleanings, then wait at least 6 hours without printing. If still poor, a cartridge may be old or damaged.
WorkForce Pro WF-3820 series (cartridge, touchscreen)WF-3820, WorkForce Pro WF-3820, WF-3820DWFInkjet
Print a test or status page
- Press the home button, if necessary.
- Select Settings > General Settings > Network Settings > Network Status > Print Status Sheet.
- Select Print.
Source: WF-3820 Series User's Guide (CPD-58812), p.57 'Printing a Network Status Sheet' (files.support.epson.com). Last checked .
Nozzle check
- Control panel: make sure the LCD shows no errors and load a few sheets of plain paper.
- Press the home button if necessary, then select Maintenance > Print Head Nozzle Check.
- Select Start.
- No gaps: select O. Gaps or a faint pattern: select X and follow the on-screen instructions to clean, re-check, and repeat as needed.
- Computer utility: load a few sheets of plain paper.
- Open the utility. Windows: right-click the product icon in the right side of the taskbar (click the up arrow first if it is hidden). Mac: Apple menu or Dock > System Preferences > Print & Fax, Print & Scan, or Printers & Scanners > select the product > Options & Supplies > Utility > Open Printer Utility.
- Select Print Head Nozzle Check and click Print.
- No gaps: click Finish. Gaps or a faint pattern: clean the print head.
Source: WF-3820 Series User's Guide (CPD-58812), pp.258-261 'Checking the Nozzles Using the Product Control Panel' / 'Using a Computer Utility' (files.support.epson.com). Last checked .
Cleaning
- Control panel: make sure the LCD shows no errors and load a few sheets of plain paper.
- Press the home button if necessary, then select Maintenance > Print Head Cleaning.
- Select Start. Never turn the printer off or open the front cover during the cycle.
- Select Check, then Print, to confirm the head is clean.
- Computer utility: load a few sheets of plain paper, open the utility (Windows: right-click the product icon in the right side of the taskbar (click the up arrow first if it is hidden). Mac: Apple menu or Dock > System Preferences > Print & Fax, Print & Scan, or Printers & Scanners > select the product > Options & Supplies > Utility > Open Printer Utility.)
- Select Print Head Cleaning and click Start. Do not turn the product off during the cycle.
- When the cycle finishes, click Print Nozzle Check Pattern, then Print.
- No gaps: click Finish. Gaps or faint: click Clean to clean again.
Source: WF-3820 Series User's Guide (CPD-58812), pp.262-264 'Cleaning the Print Head Using the Product Control Panel' / 'Using a Computer Utility' (files.support.epson.com). Last checked .
Alignment
- Make sure the LCD shows no errors and load a few sheets of plain paper.
- Press the home button if necessary, then select Maintenance > Print Head Alignment.
- Choose Ruled Line Alignment (misaligned vertical lines) or Horizontal Alignment (horizontal banding).
- Follow the on-screen instructions to print the alignment sheet. Do not cancel while it prints.
- Ruled Line Alignment: for patterns 1 and 2, select the pattern with the least misaligned vertical line. Horizontal Alignment: select the pattern with the least separation or overlap.
- Select Done.
Source: WF-3820 Series User's Guide (CPD-58812), pp.265-266 'Aligning the Print Head Using the Product Control Panel' (files.support.epson.com). Last checked .
Not listed here: print quality report. We could not confirm these steps in an official source for this family, so check your printer’s manual.
Note: Also has Settings > Maintenance > Print Quality Adjustment (guide p.267), a guided combined adjustment that prints an alignment sheet. It is not a separate quality report. Limit: up to 4 cleanings, then wait at least 6 hours without printing.
WorkForce Pro WF-4820 / WF-4830 series (cartridge, touchscreen)WF-4830, WF-4820, WorkForce Pro WF-4830, WorkForce Pro WF-4820Inkjet
Print a test or status page
- Press the home button, if necessary.
- Select Settings > General Settings > Network Settings > Network Status > Print Status Sheet.
- Select Print.
Source: WF-4820/WF-4830 Series User's Guide (CPD-58814), p.63 'Printing a Network Status Sheet' (files.support.epson.com). Last checked .
Nozzle check
- Control panel: make sure the LCD shows no errors and load a few sheets of plain paper.
- Press the home button if necessary, then select Settings > Maintenance > Print Head Nozzle Check.
- Select Start.
- No gaps: select O. Gaps or a faint pattern: select X and follow the on-screen instructions to clean, re-check, and repeat as needed.
- Computer utility: load a few sheets of plain paper.
- Open the utility. Windows: right-click the product icon in the right side of the taskbar (click the up arrow first if it is hidden). Mac: Apple menu or Dock > System Preferences or System Settings > Print & Fax, Print & Scan, or Printers & Scanners > select the product > Options & Supplies > Utility > Open Printer Utility.
- Select Nozzle Check or Print Head Nozzle Check and click Print.
- No gaps: click Finish. Gaps or a faint pattern: clean the print head.
Source: WF-4820/WF-4830 Series User's Guide (CPD-58814), pp.282-285 'Checking the Nozzles Using the Product Control Panel' / 'Using a Computer Utility' (files.support.epson.com). Last checked .
Cleaning
- Control panel: make sure the LCD shows no errors and load a few sheets of plain paper.
- Press the home button if necessary, then select Maintenance > Print Head Cleaning.
- Select Start. Never turn the printer off or open the front cover during the cycle.
- Select Yes, then Start, to print a nozzle check and confirm the head is clean.
- Computer utility: load a few sheets of plain paper, open the utility (Windows: right-click the product icon in the right side of the taskbar (click the up arrow first if it is hidden). Mac: Apple menu or Dock > System Preferences or System Settings > Print & Fax, Print & Scan, or Printers & Scanners > select the product > Options & Supplies > Utility > Open Printer Utility.)
- Select Head Cleaning or Print Head Cleaning and click Start. Do not turn the product off during the cycle.
- When the cycle finishes, click Print Nozzle Check Pattern, then Print.
- No gaps: click Finish. Gaps or faint: click Clean to clean again.
Source: WF-4820/WF-4830 Series User's Guide (CPD-58814), pp.286-288 'Cleaning the Print Head Using the Product Control Panel' / 'Using a Computer Utility' (files.support.epson.com). Last checked .
Alignment
- Make sure the LCD shows no errors and load a few sheets of plain paper.
- Press the home button if necessary, then select Maintenance > Print Head Alignment.
- Choose Ruled Line Alignment (misaligned vertical lines) or Horizontal Alignment (horizontal banding).
- Follow the on-screen instructions to print the alignment sheet. Do not cancel while it prints.
- Ruled Line Alignment: for patterns 1 and 2, select the pattern with the least misaligned vertical line. Horizontal Alignment: select the pattern with the least separation or overlap.
- Select Done.
Source: WF-4820/WF-4830 Series User's Guide (CPD-58814), pp.289-290 'Aligning the Print Head Using the Product Control Panel' (files.support.epson.com). Last checked .
Not listed here: print quality report. We could not confirm these steps in an official source for this family, so check your printer’s manual.
Note: The guide's nozzle-check path starts at Settings > Maintenance while its cleaning and alignment paths start at Maintenance. Both are recorded as printed. Also has Settings > Maintenance > Print Quality Adjustment (p.291), a combined guided adjustment, not a report. Limit: up to 3 cleanings, then turn off and wait at least 12 hours.
SureColor P700 / P900 (photo, touchscreen)SureColor P700, SureColor P900, SC-P700, SC-P900, P700, P900Inkjet
Print a test or status page
- On the LCD, select the menu icon shown in the guide (the same one used to reach General Settings).
- Select General Settings > Network Settings > Network Status.
- Select Print Status Sheet.
Source: SureColor P700/P900 User's Guide (CPD-58636), p.29 'Printing a Network Status Sheet' (files.support.epson.com). Last checked .
Nozzle check
- Control panel: load a few sheets of plain paper in the rear paper feeder.
- Select the menu icon on the LCD, then Maintenance > Print Head Nozzle Check.
- Select Start.
- No gaps: select O to exit. Gaps or a faint pattern: select X, then Head Cleaning. Almost the entire pattern missing: select X, then Power Cleaning.
- Follow the on-screen instructions to clean, re-check, and repeat as needed.
- Computer utility: load a few sheets of plain paper.
- Open the utility. Windows: right-click the product icon in the right side of the taskbar (click the up arrow first if it is hidden). Mac: Apple menu or Dock > System Preferences or System Settings > Print & Fax, Print & Scan, or Printers & Scanners > select the product > Options & Supplies > Utility > Open Printer Utility.
- Select Nozzle Check or Print Head Nozzle Check and click Print.
- No gaps: click Finish. Gaps or a faint pattern: clean the print head.
- Almost the entire pattern missing: click Finish and run a Power Cleaning.
Source: SureColor P700/P900 User's Guide (CPD-58636), pp.127-130 'Checking the Nozzles Using the Product Control Panel' / 'Using a Computer Utility' (files.support.epson.com). Last checked .
Cleaning
- Control panel: load plain paper in the rear paper feeder, select the menu icon, then Maintenance > Print Head Nozzle Check and select Start (the guide starts head cleaning from the nozzle-check flow).
- Gaps or faint: select X and follow the on-screen instructions to clean. Never turn the printer off during a cleaning cycle.
- Computer utility: load a few sheets of plain paper, open the utility (Windows: right-click the product icon in the right side of the taskbar (click the up arrow first if it is hidden). Mac: Apple menu or Dock > System Preferences or System Settings > Print & Fax, Print & Scan, or Printers & Scanners > select the product > Options & Supplies > Utility > Open Printer Utility.)
- Select Head Cleaning or Print Head Cleaning and click Start. Do not turn the product off during the cycle.
- When the cycle finishes, click Print Nozzle Check Pattern, then Print.
- No gaps: click Finish. Gaps or faint: click Clean to clean again.
- Power Cleaning (control panel): load plain paper in the rear paper feeder, select the menu icon, then Maintenance > Power Cleaning, and select Start. Print a nozzle check afterwards.
Source: SureColor P700/P900 User's Guide (CPD-58636), pp.131-136 'Print Head Cleaning' and 'Running a Power Cleaning Using the Product Control Panel' (files.support.epson.com). Last checked .
Alignment
- Control panel: load plain paper in the rear paper feeder, select the menu icon, then Maintenance > Print Head Alignment.
- Select Start to print the alignment sheet. Do not cancel while it prints.
- Follow the on-screen screens to choose the number of the best square in each pattern set.
- Computer utility alternative: open the utility (Windows: right-click the product icon in the right side of the taskbar (click the up arrow first if it is hidden). Mac: Apple menu or Dock > System Preferences or System Settings > Print & Fax, Print & Scan, or Printers & Scanners > select the product > Options & Supplies > Utility > Open Printer Utility.), select Print Head Alignment, click Next, then Print. Choose the best pattern in each set, using Realignment if none is aligned, then click Finish.
Source: SureColor P700/P900 User's Guide (CPD-58636), p.136 'Aligning the Print Head Using the Product Control Panel' / 'Using a Computer Utility' (files.support.epson.com). Last checked .
Not listed here: print quality report. We could not confirm these steps in an official source for this family, so check your printer’s manual.
Note: The guide shows the starting LCD icon only as an image, so its name could not be confirmed from the text. Limit: up to 3 cleanings, then turn off with the power button and wait at least 6 hours. After that, run a Power Cleaning.
EcoTank L3210 / L3200 series (no LCD, button-only)L3210, L3200 Series, L3210 Series, EcoTank L3210Inkjet
Nozzle check
- Product buttons: press the power button to turn the printer off.
- Load a few sheets of plain paper.
- Hold down the stop button and press the power button to turn the printer on. Release both buttons once it turns on.
- The nozzle check pattern prints. It can take a few seconds; if nothing prints, check that paper is loaded.
- No gaps: the head is clean. Gaps or faint: clean the print head. Almost the entire pattern missing: run a Power Cleaning.
- Computer utility: load a few sheets of plain paper.
- Open the utility. Windows: right-click the product icon in the right side of the taskbar (click the up arrow first if it is hidden). Mac: Apple menu or Dock > System Preferences > Print & Fax, Print & Scan, or Printers & Scanners > select the product > Options & Supplies > Utility > Open Printer Utility.
- Select Print Head Nozzle Check and click Print.
- No gaps: click Finish. Gaps or a faint pattern: clean the print head.
- Almost the entire pattern missing: click Finish and run a Power Cleaning.
Source: L3210 User's Guide (CPD-60181, Epson America), pp.114-117 'Checking the Nozzles Using the Product Buttons' / 'Using a Computer Utility' (files.support.epson.com). Last checked .
Cleaning
- Product buttons: make sure no product lights show an error and load a few sheets of plain paper.
- Hold down the stop button for 5 seconds to start the cleaning cycle. The power light flashes during the cycle and stays on when it finishes.
- Never turn the printer off or open the front cover during a cleaning cycle.
- Run a nozzle check to confirm the head is clean.
- Computer utility: load a few sheets of plain paper, open the utility (Windows: right-click the product icon in the right side of the taskbar (click the up arrow first if it is hidden). Mac: Apple menu or Dock > System Preferences > Print & Fax, Print & Scan, or Printers & Scanners > select the product > Options & Supplies > Utility > Open Printer Utility.)
- Select Print Head Cleaning and click Start. Do not turn the product off during the cycle.
- When the cycle finishes, click Print Nozzle Check Pattern, then Print.
- No gaps: click Finish. Gaps or faint: click Clean to clean again.
- Almost the entire pattern missing: click Finish and run a Power Cleaning.
- Power Cleaning (computer utility only): make sure each ink tank is at least one-third full, open the utility (Windows: right-click the product icon in the taskbar, select Printer Settings, and click the Maintenance tab.), select Power Cleaning, and follow the on-screen instructions. Run a nozzle check afterwards.
Source: L3210 User's Guide (CPD-60181, Epson America), pp.119-124 'Print Head Cleaning' and 'Power Cleaning Using a Computer Utility' (files.support.epson.com). Last checked .
Alignment
- Load a few sheets of plain paper.
- Open the utility. Windows: right-click the product icon in the right side of the taskbar (click the up arrow first if it is hidden). Mac: Apple menu or Dock > System Preferences > Print & Fax, Print & Scan, or Printers & Scanners > select the product > Options & Supplies > Utility > Open Printer Utility.
- Select Print Head Alignment, click Next, then click Print to print an alignment sheet. Do not cancel while it prints.
- Follow the on-screen instructions to pick the number of the best printed pattern in each set (vertical and horizontal), clicking Next after each.
- If no pattern in a set is aligned, choose the closest one, click Realignment, and print another sheet.
- Click Finish when done.
Source: L3210 User's Guide (CPD-60181, Epson America), pp.125-126 'Aligning the Print Head Using a Computer Utility' (files.support.epson.com). Last checked .
Not listed here: print a test or status page, print quality report. We could not confirm these steps in an official source for this family, so check your printer’s manual.
Note: The international guide (L3210 Series/L3200 Series, NPD6449, download.epson-europe.com) gives the same button combination: turn on while holding the stop button and release when the power light flashes. It also says to hold the stop button for 5 seconds to clean. That guide shows button icons rather than names; the stop identification comes from its button table ('Stops the current operation'). USB-only model, so the guide has no network status sheet.
L805 (ink tank photo, no LCD, button-only)L805, L805 SeriesInkjet
Print a test or status page
- Press the network status button (button C in the guide's control-panel diagram) to print the network status sheet.
Source: L805 Series User's Guide (NPD5362-00 EN, Epson Europe), p.11 'Buttons and Lights' and p.57 (download.epson-europe.com). Last checked .
Nozzle check
- Product buttons: load A4 plain paper.
- Press the power button to turn the printer off.
- Turn the printer on while holding down the paper button (the button the guide also uses to load and eject paper). Release the buttons when the power light flashes.
- The nozzle check pattern prints. Broken lines or missing segments (the guide's 'NG' example) mean the nozzles may be clogged. No broken lines (the 'OK' example) means no cleaning is needed.
- Windows: open the printer driver window and click Nozzle Check on the Maintenance tab, then follow the on-screen instructions.
- Mac: System Preferences > Printers & Scanners (or Print & Scan, Print & Fax) > select the printer > Options & Supplies > Utility > Open Printer Utility > Nozzle Check.
Source: L805 Series User's Guide (NPD5362-00 EN, Epson Europe), pp.50-51 'Checking and Cleaning the Print Head' (download.epson-europe.com). Last checked .
Cleaning
- Product buttons: hold the head-cleaning button (button D in the guide's diagram) for 3 seconds until the power light starts flashing. Head cleaning starts.
- Do not open the printer cover or turn the printer off during cleaning.
- When the power light stops flashing, print another nozzle check pattern. Repeat cleaning and checking until all lines print completely.
- From a computer, run Nozzle Check from the Maintenance tab (Windows) or Epson Printer Utility (Mac) and follow the on-screen instructions.
- Power Ink Flushing (replaces ink in the tubes, uses a lot of ink): Windows: driver Maintenance tab > Power Ink Flushing. Mac: Open Printer Utility > Power Ink Flushing. Then turn the printer off and wait at least 12 hours.
Source: L805 Series User's Guide (NPD5362-00 EN, Epson Europe), pp.50-52 'Checking and Cleaning the Print Head' and 'Replacing Ink inside the Ink Tubes' (download.epson-europe.com). Last checked .
Alignment
- Load A4 plain paper.
- Windows: open the printer driver window and click Print Head Alignment on the Maintenance tab.
- Mac: System Preferences > Printers & Scanners (or Print & Scan, Print & Fax) > select the printer > Options & Supplies > Utility > Open Printer Utility > Print Head Alignment.
- Follow the on-screen instructions.
Source: L805 Series User's Guide (NPD5362-00 EN, Epson Europe), pp.52-53 'Aligning the Print Head' (download.epson-europe.com). Last checked .
Not listed here: print quality report. We could not confirm these steps in an official source for this family, so check your printer’s manual.
Note: The PDF shows buttons as icons. Names here come from the guide's button table: one button loads and ejects paper, and button D is held for more than 3 seconds to run head cleaning. The PDF metadata title is 'L805 Series'.
L1300 / L1800 (A3 ink tank, no LCD, button-only)L1800, L1300Inkjet
Nozzle check
- Product buttons: press the power button to turn the printer off.
- Load a few sheets of plain paper.
- Hold down the paper button and press the power button to turn the printer on. Release both buttons once it turns on.
- The nozzle check pattern prints. No gaps: the head is clean. Gaps or a faint pattern: clean the print head.
- Computer utility: Windows: right-click the product icon in the taskbar. Mac: System Preferences > Print & Fax / Print & Scan / Printers & Scanners > select the product > Options & Supplies > Utility > Open Printer Utility.
- Select Nozzle Check and click Print. No gaps: click Finish. Gaps or faint: clean the print head.
Source: L1300/L1800 User's Guide (CPD-40326), p.67 'Checking the Nozzles Using the Product Buttons' / 'Using a Computer Utility' (files.support.epson.com). Last checked .
Cleaning
- Product buttons: make sure no product lights show an error and load a few sheets of plain paper.
- Hold down the ink button for 3 seconds to start the cleaning cycle. The power light flashes during the cycle and stays on when it finishes. Never turn the printer off during the cycle.
- Run a nozzle check to confirm the head is clean.
- Computer utility: open the utility, select Head Cleaning, click Start, then click Print Nozzle Check Pattern and Print. Click Clean again if there are gaps.
- Ink Tube Flushing (Power Ink Flushing): Windows: taskbar icon > Printer Settings > Maintenance tab > Power Ink Flushing. Mac: Open Printer Utility > Power Ink Flushing. Afterwards, turn the printer off and wait at least 12 hours before printing.
Source: L1300/L1800 User's Guide (CPD-40326), pp.70-74 'Print Head Cleaning' and 'Flushing the Ink Tubes Using a Computer Utility' (files.support.epson.com). Last checked .
Alignment
- Make sure no product lights show an error and load a few sheets of plain paper.
- Open the utility (Windows: right-click the product icon in the taskbar. Mac: Open Printer Utility).
- Select Print Head Alignment and the alignment type if asked, click Next, then Print. Do not cancel while it prints.
- Pick the number of the best printed pattern for each set, clicking Next after each. Use Realignment if no pattern is aligned.
- Click Finish when done.
Source: L1300/L1800 User's Guide (CPD-40326), pp.75-76 'Aligning the Print Head Using a Computer Utility' (files.support.epson.com). Last checked .
Not listed here: print a test or status page, print quality report. We could not confirm these steps in an official source for this family, so check your printer’s manual.
Note: Older guide (OS X 10.5-10.9 era). USB-only model, so the guide has no network status sheet. Limit: up to 3 cleanings, then turn off and wait at least 12 hours.
How do I print an Epson status sheet?
Epson calls its built-in test page a status sheet or network status sheet. On screen models it is in the setup or network menu. On button-only models such as the ET-2400 it is a button hold. Some L-series models in our list have no status sheet in their guides at all, so use the nozzle check instead.
How do I run an Epson nozzle check?
Every Epson in our list can print a nozzle check from the control panel, the buttons, or the Epson utility on Windows and Mac. A complete pattern has no gaps. Epson’s ET-2800 guide says gaps or a faint pattern mean the head needs cleaning. Tap the gaps you see into our nozzle check reader to get a verdict.
How do I clean an Epson print head without wasting ink?
Clean only after a nozzle check shows gaps, then check again after each cycle. Stop at your model’s limit and leave the printer off for the time Epson gives. Ink keeps softening dried nozzles while the printer rests. The limits from each guide are listed below.
What Epson’s manuals say about cleaning limits
- EcoTank (ET-2800/ET-2803): if quality does not improve after cleaning the print head up to 3 times, turn the product off and wait at least 12 hours. Then run a nozzle check and clean again. If it still does not improve, run a Power Cleaning. The same 3 times / 12 hours rule appears in the ET-2400, ET-2720, ET-2760, ET-2850, ET-3850, ET-4800 and L3210 (Epson America) guides.Source on files.support.epson.com, checked Oct 12, 2026
- Reading the nozzle check (ET-2800): no gaps in the lines means the print head is clean. Gaps or a faint pattern means it needs cleaning. All or most lines missing means it needs a Power Cleaning.Source on files.support.epson.com, checked Oct 12, 2026
- Power Cleaning (EcoTank ET-2800): use it only if needed because it consumes a lot of ink. Each ink tank must be at least one-third full or the product may be damaged. If there is no improvement, turn off and wait at least 12 hours before another Power Cleaning. It can make the ink pads reach capacity sooner, and at end of pad life the printer stops and needs Epson service.Source on files.support.epson.com, checked Oct 12, 2026
- ET-2800 control-panel Power Cleaning: wait at least 12 hours between Power Cleanings. If quality still does not improve after several Power Cleanings, contact Epson support.Source on files.support.epson.com, checked Oct 12, 2026
- EcoTank Photo ET-8500/ET-8550: after up to 3 cleanings with no improvement, wait at least 12 hours without printing (or longer if printing), then clean again. If there is still no improvement, run a Power Cleaning, then contact Epson. After a Power Cleaning, turn off and wait at least 12 hours before another nozzle check or cleaning.Source on files.support.epson.com, checked Oct 12, 2026
- Expression Home XP-4100 (cartridge): if there is no improvement after cleaning up to 4 times, wait at least 6 hours without printing (or longer if printing), then clean again. If it still does not improve, contact Epson.Source on files.support.epson.com, checked Oct 12, 2026
- Expression Premium XP-6100 (cartridge): if there is no improvement after cleaning up to 3 times, wait at least 6 hours without printing, then run the nozzle check and clean again if necessary. If it still does not improve, contact Epson.Source on files.support.epson.com, checked Oct 12, 2026
- WorkForce WF-2850 (cartridge): if there is no improvement after cleaning up to 4 times, wait at least 6 hours without printing (or longer if printing), then clean again. If it still does not improve, a cartridge may be old or damaged and need replacing.Source on files.support.epson.com, checked Oct 12, 2026
- WorkForce Pro WF-3820 (cartridge): if there is no improvement after cleaning up to 4 times, wait at least 6 hours without printing (or longer if printing), then clean again. If it still does not improve, contact Epson.Source on files.support.epson.com, checked Oct 12, 2026
- WorkForce Pro WF-4820/WF-4830 (cartridge): if there is no improvement after cleaning up to 3 times, turn the product off and wait at least 12 hours, then check the nozzles and clean again if necessary. If it still does not improve, contact Epson.Source on files.support.epson.com, checked Oct 12, 2026
- SureColor P700/P900: if there is no improvement after cleaning up to 3 times, turn the product off with the power button and wait at least 6 hours, then run a nozzle check and clean again. If it still does not improve, run a Power Cleaning. If nozzles are still clogged after a Power Cleaning, wait at least 6 hours without printing before cleaning again.Source on files.support.epson.com, checked Oct 12, 2026
- L3210 Series (international guide): nozzle pattern A (all lines printed) needs no action. B or close to B (some nozzles clogged): hold the stop button for 5 seconds to clean. C or close to C (most lines missing): run Power Cleaning. After 3 rounds of check and clean without improvement, wait at least 12 hours without printing (turning the printer off with the power button is recommended), then repeat. Power Cleaning needs every tank at least a third full and a 12-hour interval between runs.Source on download.epson-europe.com, checked Oct 12, 2026
- L805: broken lines or missing segments (the 'NG' pattern) mean the nozzles may be clogged. No broken lines (the 'OK' pattern) means cleaning is not needed. If quality does not improve after 3 rounds of nozzle check and cleaning, wait at least 12 hours without printing (turning the printer off is recommended), then repeat. After Power Ink Flushing, turn off and wait at least 12 hours; it cannot be run again within 12 hours.Source on download.epson-europe.com, checked Oct 12, 2026
- L1300/L1800: if there is no improvement after cleaning up to 3 times, turn off and wait at least 12 hours, then check and clean again. After ink tube flushing, turn off and wait at least 12 hours before printing.Source on files.support.epson.com, checked Oct 12, 2026
- All guides: cleaning uses ink, so clean only when print quality declines. Run a nozzle check first so you do not clean unnecessarily. On EcoTanks you cannot clean if ink has reached the lower line, and on cartridge models you cannot clean if a cartridge is expended. Never turn the printer off (or open the cover or scanner unit) during a cleaning cycle.Source on files.support.epson.com, checked Oct 12, 2026
How do I run Epson vertical alignment?
Epson prints alignment patterns and asks you to choose the pattern with the fewest gaps or straightest lines. Some models offer vertical and horizontal (banding) alignment separately. Run alignment after a clean nozzle check, then print our alignment test page to confirm.
Sources and what we could not verify
Every procedure above links to the Epson manual or support page it came from. We publish only steps we could read in an official source. See how we verify.
General Epson sources (25)
- ET-2800/ET-2803 User's Guide (PDF) (files.support.epson.com, checked Oct 12, 2026)
- ET-2800 online guide: Checking the Nozzles Using the Product Control Panel (files.support.epson.com, checked Oct 12, 2026)
- ET-2800 online guide: Cleaning the Print Head Using the Product Control Panel (files.support.epson.com, checked Oct 12, 2026)
- ET-2800 online guide: Checking the Nozzles Using a Computer Utility (files.support.epson.com, checked Oct 12, 2026)
- ET-2800 online guide: Cleaning the Print Head Using a Computer Utility (files.support.epson.com, checked Oct 12, 2026)
- ET-2800 online guide: Power Cleaning (concept) (files.support.epson.com, checked Oct 12, 2026)
- ET-2800 online guide: Power Cleaning Using the Product Control Panel (files.support.epson.com, checked Oct 12, 2026)
- ET-2800 online guide: Aligning the Print Head Using the Product Control Panel (files.support.epson.com, checked Oct 12, 2026)
- ET-2400 User's Guide (PDF) (files.support.epson.com, checked Oct 12, 2026)
- ET-2720 User's Guide (PDF) (files.support.epson.com, checked Oct 12, 2026)
- ET-2760 User's Guide (PDF) (files.support.epson.com, checked Oct 12, 2026)
- ET-2850 User's Guide (PDF) (files.support.epson.com, checked Oct 12, 2026)
- ET-3850 User's Guide (PDF) (files.support.epson.com, checked Oct 12, 2026)
- ET-4800 User's Guide (PDF) (files.support.epson.com, checked Oct 12, 2026)
- ET-8500/ET-8550 User's Guide (PDF) (files.support.epson.com, checked Oct 12, 2026)
- XP-4100/XP-4105 User's Guide (PDF) (files.support.epson.com, checked Oct 12, 2026)
- XP-6100 User's Guide (PDF) (files.support.epson.com, checked Oct 12, 2026)
- WF-2850 User's Guide (PDF) (files.support.epson.com, checked Oct 12, 2026)
- WF-3820 Series User's Guide (PDF) (files.support.epson.com, checked Oct 12, 2026)
- WF-4820/WF-4830 Series User's Guide (PDF) (files.support.epson.com, checked Oct 12, 2026)
- SureColor P700/P900 User's Guide (PDF) (files.support.epson.com, checked Oct 12, 2026)
- L3210 User's Guide (PDF, Epson America) (files.support.epson.com, checked Oct 12, 2026)
- L3210 Series / L3200 Series User's Guide (PDF, Epson Europe, NPD6449) (download.epson-europe.com, checked Oct 12, 2026)
- L805 Series User's Guide (PDF, Epson Europe, NPD5362-00) (download.epson-europe.com, checked Oct 12, 2026)
- L1300/L1800 User's Guide (PDF) (files.support.epson.com, checked Oct 12, 2026)
Not yet verified (10)
- ET-2800/ET-2803 power-on button combination for the nozzle check: the guide documents only the Maintenance menu and the computer utility.
- ET-2700/ET-2600 button-only guides: a search snippet showed the stop+power nozzle check, but the guides were not downloaded or read, so these models are not recorded.
- Epson international HTML guides on download4.epson.biz (e.g. L3210 Series 'Checking and Cleaning the Print Head') returned HTTP 403, so the Epson Europe PDF and the Epson America PDF were used instead.
- SureColor P700/P900: the name of the LCD icon that opens the settings/maintenance menu (shown only as an image in the PDF).
- qualityReport: none of the guides checked has a separate print quality report page. WF-3820/WF-4830 'Print Quality Adjustment' is a guided adjustment and is noted, not recorded as a report.
- L805 and L3210 (international) button names: the PDFs show icons only. Names were taken from each guide's own button-function table.
- L3210 and L1800 network status sheet: the guides have none (USB models).
- ET-8500/ET-8550 Power Cleaning from a computer utility: the guide shows only the control-panel method.
- XP-4100/XP-6100/WF-2850/WF-3820/WF-4830: no Power Cleaning documented in these guides.
- L-series models other than L3210/L805/L1300/L1800 (e.g. L3250, L3260, L8050) were not checked.
Questions people ask
How do I print a test page on an Epson printer?
Epson printers print a status sheet or network status sheet from the control panel; on button-only EcoTanks it is usually a button hold. That sheet confirms the printer works. To check print quality, run the nozzle check or print our color test page.
How many times should I clean an Epson print head?
Epson sets a limit per model. The guides we checked say up to three cleanings for EcoTank, the XP-6100 and the WF-4830, and up to four for the XP-4100, WF-2850 and WF-3820. After that, turn the printer off and wait at least 6 or 12 hours, depending on the model, before trying again.
What is Epson Power Cleaning?
A stronger cleaning on EcoTank models that pushes much more ink through the head. Epson’s ET-2800 guide says to use it only when needed, to make sure every tank is at least one-third full first, and to wait at least 12 hours between Power Cleanings.
Is there an Epson printer test page PDF?
Epson’s own nozzle check and status sheet are printed by the printer, not from a PDF. For a PDF test page, use the Download PDF button above. It prints at true size on Letter or A4.