Canon Printer Test Page
Print our color test page to check a Canon printer’s output, then run Canon’s nozzle check from the printer if you see gaps. Find your PIXMA, MegaTank or imageCLASS family below for the steps from Canon’s online manuals, including when to switch to deep cleaning and when to rest the printer for 24 hours.
By Online Printer Test PageLast updated
Printed? How did it look?
- Scale: 100% or Actual size, not Fit to page
- Headers and footers: off
- Paper in the tray matches US Letter
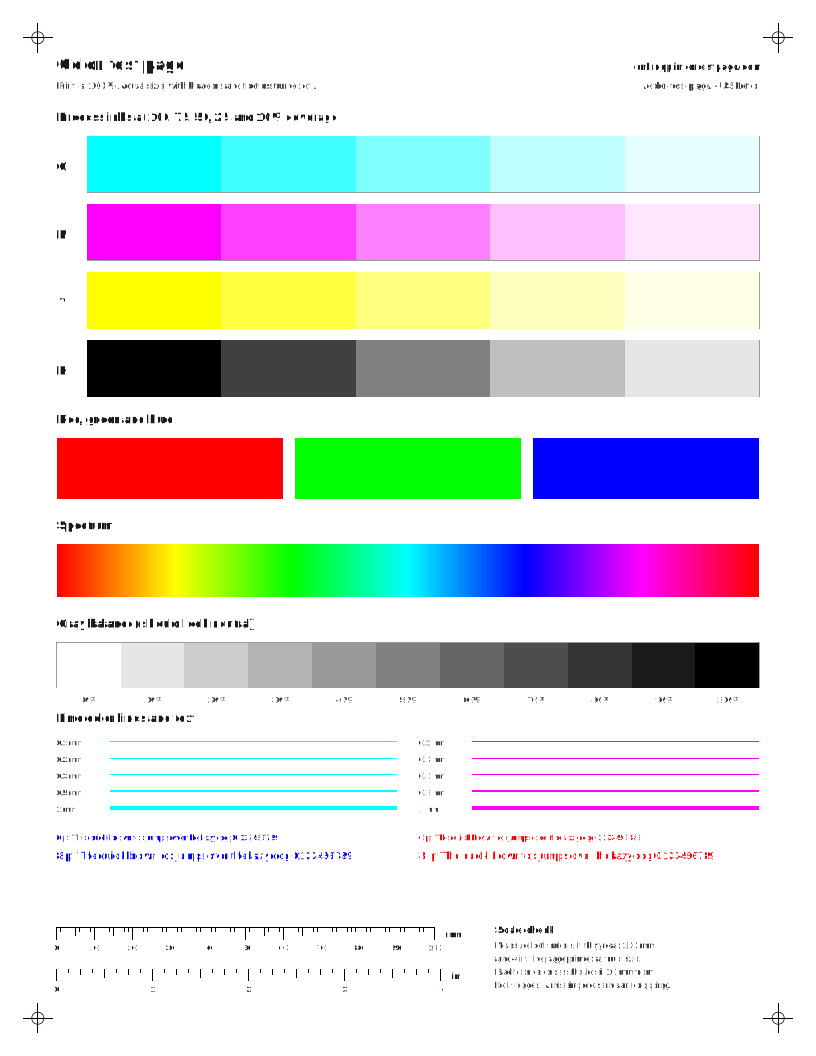
What to look for: color test page
- Each C, M, Y and K row should step evenly from solid to pale. A missing or streaky row points to that ink.
- The gray ramp should look neutral. A pink, green or blue cast means one color is printing weak or strong.
- The spectrum should flow without hard bands or gaps.
What to look for: nozzle check grid
- Every step of each staircase should be complete. A missing step or broken line points to that ink.
- Thin white lines across a solid block are the classic clogged-nozzle sign.
- For a nozzle-by-nozzle reading, also run your printer’s own nozzle check.
What to look for: black and white test page
- The solid black block should be even, with no white lines or streaks.
- You should be able to tell every gray step apart. Steps that merge at the dark end mean heavy ink or toner.
- Small text should be sharp, not fuzzy or doubled.
What to look for: alignment test page
- Vertical lines should be straight and single. Jagged or doubled lines mean the print head needs aligning.
- In the registration crosses, the colored lines should sit on top of each other.
- Diagonals and the circle should be smooth, not stepped.
What to look for: photo test print
- Skin should look natural, not orange, green or gray.
- Smooth areas like cheeks and backgrounds should be free of grain lines.
- Compare the gray ramp with the photo. A cast in both points to color balance, not the photo.
Find your Canon model
Steps are summarized from each maker’s own manuals and support pages, with a link to the source and the date we last checked it. If your model is missing, the closest family usually uses the same menus, but confirm in your manual.
13 model families
PIXMA TS3500 series (TS3520 etc.)TS3520, TS3522, TS3530, TS3550i, TS3551i, TS3500 seriesInkjet
Print a test or status page
- Make sure the printer is turned on.
- Load three sheets of A4 or Letter-sized plain paper.
- Press the Information button; the printer prints the network settings.
Source: Canon : Inkjet Manuals : TS3500 series : Printing Network Settings (ij.manual.canon). Last checked .
Nozzle check
- Make sure the printer is turned on.
- Load one sheet of A4 or Letter-sized plain paper in the rear tray.
- Press the Setup button until 1 appears on the LCD.
- Press the Black button or the Color button; the nozzle check pattern prints. Do nothing else until printing finishes.
- Examine the pattern: look for missing lines in pattern A and horizontal white streaks in pattern B. If either appears, or any color in pattern A or B does not print (e.g. magenta), clean the print head.
Source: Canon : Inkjet Manuals : TS3500 series : Printing the Nozzle Check Pattern (ij.manual.canon). Last checked .
Cleaning
- Make sure the printer is turned on.
- Press the Setup button until 2 appears on the LCD.
- Press the Black button or the Color button to start cleaning (about 1 minute); it is finished when the ON lamp lights after flashing.
- Print the nozzle check pattern to check the result.
- If the problem remains after cleaning twice, run Deep Cleaning: press the Setup button until 3 appears on the LCD, then press the Black button or the Color button (about 1 to 2 minutes).
- If still not resolved, turn off the power and deep clean again after 24 hours; if it persists, replace the FINE cartridge.
Source: Canon : Inkjet Manuals : TS3500 series : Cleaning the Print Head (ij.manual.canon). Last checked .
Alignment
- Make sure the printer is turned on.
- Load a sheet of A4 or Letter plain paper in the rear tray.
- Press the Setup button until 4 appears on the LCD.
- Press the Black button or the Color button; the alignment sheet prints.
- Place the sheet printed side down on the platen, aligning the mark at its upper-left corner with the alignment mark.
- Close the document cover gently and press the Black button or the Color button; the printer scans the sheet and adjusts automatically. Remove the sheet when the ON lamp lights after flashing.
- Optional: to print the current adjustment values, press the Setup button until 6 appears, then press the Black button or the Color button.
Source: Canon : Inkjet Manuals : TS3500 series : Aligning the Print Head (ij.manual.canon). Last checked .
Not listed here: print quality report. We could not confirm these steps in an official source for this family, so check your printer’s manual.
Note: Two-segment LCD model: functions are selected by pressing Setup until a number appears. Low ink prevents the nozzle check and alignment sheet from printing correctly; replace the low FINE cartridge first.
PIXMA TS6400 series (TS6420)TS6420, TS6420a, TS6400 seriesInkjet
Print a test or status page
- Make sure the printer is turned on.
- Load three sheets of A4 or Letter-sized plain paper.
- Press the OK button on the HOME screen.
- Select Device settings and press the OK button.
- Select LAN settings and press the OK button.
- Select Print details and press the OK button.
- Select Yes and press the OK button; the network settings print.
Source: Canon : Inkjet Manuals : TS6400 series : Printing Network Settings (ij.manual.canon). Last checked .
Nozzle check
- Make sure the printer is turned on.
- Load a sheet of A4 or Letter-sized plain paper in the cassette.
- Press the OK button, select Maintenance, then select Nozzle Check.
- Select Yes on the confirmation screen and press the OK button; the pattern prints and two pattern confirmation screens appear on the LCD.
- Select Next and examine the pattern: check pattern C for missing lines and pattern D for horizontal white streaks.
- If both look fine select All A; if either shows problems (or a color is missing) select Also B, then Yes to start cleaning.
Source: Canon : Inkjet Manuals : TS6400 series : Printing the Nozzle Check Pattern (ij.manual.canon). Last checked .
Cleaning
- Make sure the printer is turned on and load a sheet of A4 or Letter-sized plain paper in the cassette.
- Press the OK button, select Maintenance, then select Cleaning.
- Select Yes on the confirmation screen; cleaning takes about 2 minutes.
- On the pattern print confirmation screen select Yes, press the OK button to print the nozzle check pattern, select Next, and examine it.
- If the problem persists after cleaning twice, select Maintenance > Deep Cleaning > Yes (about 1 to 2 minutes), then print and check the pattern.
- If still not resolved, turn off the power and deep clean again after 24 hours; if it persists, replace the FINE cartridge.
Source: Canon : Inkjet Manuals : TS6400 series : Cleaning the Print Head (ij.manual.canon). Last checked .
Alignment
- Make sure the printer is turned on.
- Load two sheets of A4 or Letter-sized plain paper in the cassette.
- Press the OK button, select Maintenance, then select Print Head Alignment - Auto.
- Select Yes on the confirmation screen and press the OK button; the sheet prints and the head aligns automatically (about 4 to 5 minutes).
- Select OK when the completion message appears.
Source: Canon : Inkjet Manuals : TS6400 series : Aligning the Print Head (ij.manual.canon). Last checked .
Not listed here: print quality report. We could not confirm these steps in an official source for this family, so check your printer’s manual.
Note: On this model the examine page labels the printed patterns C (lines) and D (streaks); A/B are the on-screen answer choices.
PIXMA TS8300 series (TS8320 etc.)TS8320, TS8322, TS8340, TS8350, TS8351, TS8352, TS8360, TS8370Inkjet
Print a test or status page
- Make sure the printer is turned on (tap HOME if the HOME screen is not shown).
- Load three sheets of A4 or Letter-sized plain paper.
- On the HOME screen select Setup, then Device settings, then LAN settings, then Print details.
- Read the message and select Yes.
- On the password-printing confirmation screen select ON or OFF; printing starts.
Source: Canon : PIXMA Manuals : TS8300 series : Printing Network Settings (ij.manual.canon). Last checked .
Nozzle check
- Make sure the printer is turned on and load one sheet of A4 or Letter-sized plain paper in the cassette.
- On the HOME screen select Setup, then Maintenance, then Nozzle Check.
- Select Yes; the operation panel opens, the output tray extends and the pattern prints, followed by two pattern confirmation screens.
- Examine the pattern: pattern C for missing lines, pattern D for horizontal white streaks.
- Select All A if both look fine; otherwise (or if a color is missing) select Also B, then Yes to clean.
Source: Canon : PIXMA Manuals : TS8300 series : Printing the Nozzle Check Pattern (ij.manual.canon). Last checked .
Cleaning
- Make sure the printer is turned on and load a sheet of A4 or Letter-sized plain paper in the cassette.
- On the HOME screen select Setup, then Maintenance, then Cleaning.
- Select Yes; cleaning takes about 1 minute.
- At the pattern print confirmation select Yes to print the nozzle check pattern, then examine it.
- If the problem persists after cleaning twice, select Setup > Maintenance > Deep Cleaning > Yes (about 1 to 2 minutes), print the pattern and select OK at completion.
- If a particular color still prints poorly, replace that ink tank; if not resolved, turn off the power and deep clean again after 24 hours; if still unresolved, contact a Canon service center.
Source: Canon : PIXMA Manuals : TS8300 series : Cleaning the Print Head (ij.manual.canon). Last checked .
Alignment
- Make sure the printer is turned on.
- Load two sheets of A4 or Letter-sized plain paper in the cassette.
- On the HOME screen select Setup, then Maintenance, then Print Head Alignment - Auto.
- Confirm the message and select Yes; the sheet prints and the head aligns automatically (about 4 minutes).
- Select OK when the completion message appears.
Source: Canon : PIXMA Manuals : TS8300 series : Aligning the Print Head (ij.manual.canon). Last checked .
Not listed here: print quality report. We could not confirm these steps in an official source for this family, so check your printer’s manual.
Note: Uses individual ink tanks (not FINE cartridges). TS9500 series (TS9520) was not separately verified.
PIXMA MG3600 series (MG3620 etc.)MG3610, MG3620, MG3640, MG3650, MG3660, MG3670, MG3680, MG3600 seriesInkjet
Print a test or status page
- Make sure the machine is turned on.
- Load two sheets of A4 or Letter-sized plain paper.
- Press and hold the Wi-Fi button and release it when the ON lamp flashes.
- Press the Wi-Fi button again; the network settings print.
Source: Canon : PIXMA Manuals : MG3600 series : Printing Network Settings (ij.manual.canon). Last checked .
Nozzle check
- Make sure the power is on.
- Load one sheet of A4 or Letter-sized plain paper in the front tray.
- Open the output tray extension, open the paper output tray, then extend the paper output support.
- Hold down the Stop button until the Alarm lamp flashes once, then release it immediately; the pattern prints.
- Examine the pattern: missing lines in pattern A or horizontal white streaks in pattern B mean the print head needs cleaning.
Source: Canon : PIXMA Manuals : MG3600 series : Printing the Nozzle Check Pattern (ij.manual.canon). Last checked .
Cleaning
- Make sure the power is on.
- Hold down the Stop button until the Alarm lamp flashes twice, then release it immediately; cleaning takes about 1 to 2 minutes and ends when the ON lamp lights after flashing.
- Print the nozzle check pattern to check the result.
- If the problem persists after cleaning twice, deep clean: hold down the Stop button until the Alarm lamp flashes three times, then release it (about 1 to 2 minutes).
- If still not resolved, turn off the power and deep clean again after 24 hours (do not unplug); if it persists, replace the FINE cartridge, then contact the service center.
Source: Canon : PIXMA Manuals : MG3600 series : Cleaning the Print Head (ij.manual.canon). Last checked .
Alignment
- Make sure the power is on.
- Load one sheet of A4 or Letter-sized plain paper in the front tray and open the output tray/extension/support.
- Hold down the Stop button until the Alarm lamp flashes four times, then release it immediately; the alignment sheet prints.
- Place the sheet printed side down on the platen glass, aligning the mark at its bottom-right corner with the alignment mark.
- Close the document cover gently and press the Black or Color button; adjustment is complete when the ON lamp lights after flashing.
- Optional: to print current adjustment values, hold Stop until the Alarm lamp flashes six times.
Source: Canon : PIXMA Manuals : MG3600 series : Aligning the Print Head (ij.manual.canon). Last checked .
Not listed here: print quality report. We could not confirm these steps in an official source for this family, so check your printer’s manual.
Note: No-LCD model: functions are chosen by counting Alarm lamp flashes while holding Stop (1 nozzle check, 2 cleaning, 3 deep cleaning, 4 alignment, 6 alignment values).
PIXMA MX920 series (MX922)MX922, MX920 seriesInkjet
Print a test or status page
- Make sure the machine is turned on and load one sheet of A4 or Letter-sized plain paper.
- Press the MENU button.
- Select Setup and press OK, then Device settings and press OK.
- Select LAN settings, then Confirm LAN settings, then Print LAN details (press OK after each).
- Select Yes and press OK; the network setting information prints.
Source: Canon : PIXMA Manuals : MX920 series : Printing Out Network Setting Information (ij.manual.canon). Last checked .
Nozzle check
- Make sure the power is on and load A4 or Letter plain paper in the lower cassette.
- Open the paper output tray, extend the output support, and close the inner cover if open.
- Press the MENU button, select Setup and press OK, then select Maintenance and press OK.
- Select Print nozzle check pattern and press OK, then select Yes and press OK; the pattern prints.
- Compare pattern (1) for missing lines and pattern (2) for horizontal white streaks; select All A if both are fine, or Also B and then Yes to start cleaning.
Source: Canon : PIXMA Manuals : MX920 series : Printing the Nozzle Check Pattern (ij.manual.canon). Last checked .
Cleaning
- Make sure the power is on, load A4 or Letter plain paper in the lower cassette, open the output tray and close the inner cover.
- Press MENU, select Setup > Maintenance > Cleaning (press OK after each), then select Yes and press OK; cleaning takes about 2 minutes.
- At the pattern print confirmation select Yes and press OK, then examine the nozzle check pattern.
- If the problem persists after cleaning twice, select MENU > Setup > Maintenance > Deep cleaning > Yes (about 2 minutes), then print the pattern.
- If a specific color still prints poorly, replace that ink tank; otherwise turn off the power (do not unplug) and deep clean again after 24 hours; if still unresolved, contact the service center.
Source: Canon : PIXMA Manuals : MX920 series : Cleaning the Print Head (ij.manual.canon). Last checked .
Alignment
- Make sure the power is on.
- Load A4 or Letter-sized Matte Photo Paper MP-101 (or the supplied paper) in the lower cassette, whiter print side facing down.
- Open the paper output tray, extend the support, and close the inner cover if open.
- Press MENU, select Setup > Maintenance > Auto head alignment (press OK after each), then select Yes and press OK; the sheet prints and alignment runs automatically (about 4 minutes).
- Press OK at the completion message.
Source: Canon : PIXMA Manuals : MX920 series : Aligning the Print Head (ij.manual.canon). Last checked .
Not listed here: print quality report. We could not confirm these steps in an official source for this family, so check your printer’s manual.
Note: Auto head alignment requires Matte Photo Paper MP-101 or the supplied paper; plain paper is only for manual alignment. The MX920 series manual top page does not list individual model numbers; MX922 is assigned to this series by Canon's series naming.
PIXMA MegaTank G3060 series (G3260 etc.)G3260, G3262, G3060, G3160, G3360, G3460, G3560, G3660Inkjet
Print a test or status page
- Make sure the printer is turned on.
- Load two sheets of A4 or Letter-sized plain paper.
- Press the Setup button.
- Select Device settings and press OK, then LAN settings and press OK.
- Select Print LAN details and press OK; the network settings print.
Source: Canon : Inkjet Manuals : G3060 series : Printing Network Settings (ij.manual.canon). Last checked .
Nozzle check
- Make sure the printer is turned on.
- Load one sheet of A4 or Letter-sized plain paper in the rear tray.
- Press the Setup button, use the left/right buttons to select Maintenance, and press OK.
- Select Nozzle check and press OK; the pattern prints.
- Examine it: missing lines in pattern A or horizontal white streaks in pattern B (or a color not printing) mean the print head needs cleaning.
Source: Canon : Inkjet Manuals : G3060 series : Printing the Nozzle Check Pattern (ij.manual.canon). Last checked .
Cleaning
- Make sure the printer is turned on.
- Press the Setup button, select Maintenance with the left/right buttons, and press OK.
- Select Cleaning and press OK (about 1 minute), then print the nozzle check pattern.
- If the problem persists after cleaning twice, select Maintenance > Deep Cleaning and press OK (about 2 to 3 minutes), then check the pattern.
- If still not resolved, turn off the power and deep clean again after 24 hours.
- If still not resolved, run Ink Flush: Setup > Maintenance > Ink Flush > choose All colors, Color, or BK > OK > OK > Yes > Yes (about 5 to 6 minutes). Check ink levels are above the single dot and the maintenance cartridge has space first.
Source: Canon : Inkjet Manuals : G3060 series : Cleaning the Print Head (ij.manual.canon). Last checked .
Alignment
- Make sure the printer is turned on.
- Load one sheet of A4 or Letter plain paper in the rear tray.
- Press the Setup button, select Maintenance, and press OK.
- Select Head alignment and press OK; the alignment sheet prints.
- Place the sheet printed side down on the platen, aligning the mark at its upper-left corner with the alignment mark.
- Close the document cover gently and press the Black or Color button; the printer scans and adjusts automatically. Remove the sheet when done.
Source: Canon : Inkjet Manuals : G3060 series : Aligning the Print Head (ij.manual.canon). Last checked .
Not listed here: print quality report. We could not confirm these steps in an official source for this family, so check your printer’s manual.
Note: Ink Flush is this series' equivalent of the strongest cleaning; the macOS Remote UI exposes Cleaning, Deep Cleaning and Ink Flush (not named 'System Cleaning'). If Ink Flush does not help, Canon says replacing the print head may resolve the issue.
PIXMA MegaTank G6000 series (G6020 etc.)G6020, G6010, G6011, G6030, G6040, G6045, G6050, G6055Inkjet
Print a test or status page
- Make sure the printer is turned on.
- Load three sheets of A4 or Letter-sized plain paper.
- Press the Setup button.
- Select Device settings and press OK, then LAN settings and press OK.
- Select Print LAN details and press OK; the network settings print.
Source: Canon : Inkjet Manuals : G6000 series : Printing Network Settings (ij.manual.canon). Last checked .
Nozzle check
- Make sure the printer is turned on.
- Load a sheet of A4 or Letter-sized plain paper in the cassette.
- Press the Setup button, select Maintenance with the left/right buttons, and press OK.
- Select Nozzle check and press OK; the pattern prints.
- Examine it: missing lines in pattern A or horizontal white streaks in pattern B (or a missing color) mean the print head needs cleaning.
Source: Canon : Inkjet Manuals : G6000 series : Printing the Nozzle Check Pattern (ij.manual.canon). Last checked .
Cleaning
- Make sure the printer is turned on.
- Press the Setup button, select Maintenance, and press OK.
- Select Cleaning and press OK (about 2 minutes), then print the nozzle check pattern.
- If the problem persists after cleaning twice, select Maintenance > Deep Cleaning and press OK (about 1 minute).
- If still not resolved, turn off the power (do not unplug) and deep clean again after 24 hours.
- If still not resolved, run Ink Flush: Setup > Maintenance > Ink Flush > All colors, Color, or BK > OK > OK > Yes > Yes (about 8 minutes); refill any tank below the single dot first.
Source: Canon : Inkjet Manuals : G6000 series : Cleaning the Print Head (ij.manual.canon). Last checked .
Alignment
- Make sure the printer is turned on.
- Load two sheets of A4 or Letter-sized plain paper in the cassette.
- Press the Setup button, select Maintenance, and press OK.
- Select Head alignment and press OK; the sheet prints and the head aligns automatically (about 4 to 5 minutes).
Source: Canon : Inkjet Manuals : G6000 series : Aligning the Print Head (ij.manual.canon). Last checked .
Not listed here: print quality report. We could not confirm these steps in an official source for this family, so check your printer’s manual.
Note: G7000 series (G7020) deep cleaning page shows the same Setup > Maintenance > Deep Cleaning path (about 1 minute; 24-hour retry; do not unplug): https://ij.manual.canon/ij/webmanual/Manual/All/G7000%20series/EN/UG/ug-136.html. Other G7000 procedures were not individually fetched.
PIXMA MegaTank G3000 series (G3200 etc., no LCD)G3000, G3100, G3102, G3200, G3400, G3500, G3600, G3800Inkjet
Print a test or status page
- Make sure the machine is turned on.
- Load two sheets of A4 or Letter-size plain paper.
- Press and hold the Wi-Fi button and release it when the ON lamp flashes.
- Press the Wi-Fi button again; the network settings print.
Source: Canon : PIXMA Manuals : G3000 series : Printing Network Settings (ij.manual.canon). Last checked .
Nozzle check
- Make sure the printer is turned on.
- Load one sheet of A4 or Letter-sized plain paper in the rear tray.
- Pull out the paper output tray and open the output tray extension.
- Hold down the Stop button until the Alarm lamp flashes once, then release it immediately; the pattern prints.
- Examine it: missing lines in pattern A or horizontal white streaks in pattern B mean the print head needs cleaning.
Source: Canon : PIXMA Manuals : G3000 series : Printing the Nozzle Check Pattern (ij.manual.canon). Last checked .
Cleaning
- Make sure the printer is turned on.
- Hold down the Stop button until the Alarm lamp flashes twice, then release it immediately; cleaning takes about 1 minute and ends when the ON lamp lights after flashing.
- Print the nozzle check pattern to check the result.
- If the problem persists after cleaning twice, deep clean: hold down the Stop button until the Alarm lamp flashes three times, then release it (about 3 minutes).
- If deep cleaning does not help, perform System Cleaning from a computer (macOS: Canon IJ Printer Utility > Cleaning > System Cleaning, choose ink group, OK).
- If System Cleaning does not help, turn off the printer, wait 24 hours, and deep clean again; if still unresolved, the print head may be damaged - contact the service center.
Source: Canon : PIXMA Manuals : G3000 series : Cleaning the Print Head (ij.manual.canon). Last checked .
Alignment
- Make sure the power is on.
- Load one sheet of A4 or Letter-sized plain paper in the rear tray; pull out the output tray and open the extension.
- Hold down the Stop button until the Alarm lamp flashes eight times, then release it immediately; the alignment sheet prints.
- Place the sheet printed side down on the platen glass, aligning the mark at its bottom-right corner with the alignment mark.
- Close the document cover gently and press the Black or Color button; adjustment is complete when the ON lamp lights after flashing.
- Optional: to print current adjustment values, hold Stop until the Alarm lamp flashes ten times.
Source: Canon : PIXMA Manuals : G3000 series : Aligning the Print Head (ij.manual.canon). Last checked .
Not listed here: print quality report. We could not confirm these steps in an official source for this family, so check your printer’s manual.
Note: System Cleaning (computer only) 'consumes an extremely large amount of ink'; before running it, all inks in the chosen group must be at least at the single-dot mark (fill to the upper limit line if Remaining Ink Notification is enabled).
imagePROGRAF / PIXMA PRO-200 seriesPRO-200, PRO-200 seriesInkjet
Print a test or status page
- Turn on the printer and display the HOME screen (press HOME if needed).
- Load three sheets of A4 or Letter-sized plain paper.
- On the HOME screen select LAN settings and press OK.
- Select Print details and press OK.
- Read the message, select Yes and press OK.
- If asked whether to print passwords, select Yes or No and press OK; printing starts.
Source: Canon : Inkjet Manuals : PRO-200 series : Printing Network Settings (ij.manual.canon). Last checked .
Nozzle check
- Make sure the printer is turned on.
- Load a sheet of A4 or Letter-sized plain paper in the top feed.
- On the HOME screen select Maintenance, then Nozzle Check.
- Select Yes; the pattern prints and two pattern confirmation screens appear.
- Check for missing lines. If none, select All A; if lines are missing or a color does not print, select Also B, then Yes, and choose the ink group with missing lines to clean.
Source: Canon : imagePROGRAF Manuals : PRO-200 series : Printing the Nozzle Check Pattern (ij.manual.canon). Last checked .
Cleaning
- Make sure the printer is on and load a sheet of A4 or Letter-sized plain paper in the top feed.
- On the HOME screen select Maintenance > Print Head Cleaning > Cleaning.
- Choose the ink group: All colors, Pattern 1: PC / M / Y / PM, or Pattern 2: C / BK / LGY / GY, then select Yes (about 1 minute).
- Select Yes to print the nozzle check pattern and examine it.
- If the problem persists after cleaning twice, select Maintenance > Print Head Cleaning > Deep Cleaning, choose the ink group, select Yes (about 1 minute), print the pattern and select OK.
- If a particular color still prints poorly, replace that ink tank; otherwise turn off the power and deep clean again after 24 hours; if still unresolved, contact a Canon service center.
Source: Canon : imagePROGRAF Manuals : PRO-200 series : Cleaning the Print Head (ij.manual.canon). Last checked .
Alignment
- Make sure the printer is turned on and prepare two sheets of A4 or Letter paper (same type you print on).
- On the HOME screen select Maintenance > Print Head Alignment > Auto, then Yes.
- Select the paper type, then load the paper in the source shown in the message (one sheet at a time if it is the manual feed tray).
- Select OK; the sheet prints and the head aligns automatically (about 2 to 3 minutes).
- Select OK at the completion message.
Source: Canon : imagePROGRAF Manuals : PRO-200 series : Aligning the Print Head (ij.manual.canon). Last checked .
Not listed here: print quality report. We could not confirm these steps in an official source for this family, so check your printer’s manual.
Note: Ink groups: Pattern 1 = PC / M / Y / PM, Pattern 2 = C / BK / LGY / GY.
PIXMA PRO-100SPRO-100S, PRO-100S seriesInkjet
Nozzle check
- Make sure the power is on.
- Load a sheet of A4 or Letter-sized plain paper in the rear tray (the manual feed tray cannot be used).
- Open the paper output tray, pull out the extension, and close the disc tray guide if open.
- Hold down the RESUME/CANCEL button until the POWER lamp flashes twice, then release it immediately; the pattern prints.
- Check for horizontal white streaks: pattern A covers PC/M/Y/PM, pattern B covers C/BK/LGY/GY. Clean the affected group from the computer, or all colors if both show streaks.
Source: Canon : PIXMA Manuals : PRO-100S series : Printing the Nozzle Check Pattern (ij.manual.canon). Last checked .
Cleaning
- Make sure the power is on.
- Hold down the RESUME/CANCEL button until the POWER lamp flashes once, then release it immediately; all colors are cleaned (about 2 to 3 minutes) and the POWER lamp lights when done.
- Print the nozzle check pattern to check the result.
- If the problem persists after cleaning twice, run Deep Cleaning from the computer: printer driver Maintenance tab > Deep Cleaning, select the ink group, click Execute, then OK.
- If not improved, turn off the printer, wait 24 hours, and run Deep Cleaning again; if still unresolved, contact the service center.
Source: Canon : PIXMA Manuals : PRO-100S series : Cleaning the Print Head (ij.manual.canon). Last checked .
Alignment
- Make sure the power is on.
- Load two sheets of A4 or Letter-sized plain paper (white, clean both sides) in the rear tray.
- Open the paper output tray, pull out the extension, and close the disc tray guide if open.
- Hold down the RESUME/CANCEL button until the POWER lamp flashes four times, then release it immediately; the sheet prints and the head position is adjusted automatically (about 5 minutes).
Source: Canon : PIXMA Manuals : PRO-100S series : Aligning the Print Head (ij.manual.canon). Last checked .
Not listed here: print a test or status page, print quality report. We could not confirm these steps in an official source for this family, so check your printer’s manual.
Note: Deep cleaning is not available from the printer buttons on this model; it is run from the computer. Original PRO-100, PRO-10 and PRO-1000 manuals were not verified.
imageCLASS MF440 series (MF445dw)MF445dw, MF448dw, MF449dwLaser
Print a test or status page
- Load paper of the size/type the machine shows.
- Select <Menu> > <Output Report> > <Print List>.
- Select <User Data List> (or <System Manager Data List> for all settings incl. network) - or <Consumables Status Report>.
- Check that the paper size and type displayed is loaded and select <Start>.
Source: Printing Reports and Lists - imageCLASS MF449dw / MF448dw / MF445dw User's Guide (oip.manual.canon). Last checked .
Print quality report
- Make sure no documents are waiting to print and enough toner remains (cleaning uses toner).
- Load plain A4 or Letter paper in the paper drawer or multi-purpose tray.
- Select <Menu> on the Home screen, then <Adjustment/Maintenance> > <Maintenance> > <Clean Fixing Assembly>.
- Confirm the displayed paper size/type is loaded and select <OK>, then <Start>.
- When the completion message appears, press the Home key.
Source: Cleaning the Fixing Assembly - imageCLASS MF449dw / MF448dw / MF445dw User's Guide (oip.manual.canon). Last checked .
Not listed here: nozzle check, cleaning, alignment. We could not confirm these steps in an official source for this family, so check your printer’s manual.
Note: The User Data List omits Network Settings and Management Settings; print the System Manager Data List to see all settings.
imageCLASS MF650C series (MF656Cdw)MF656Cdw, MF654Cdw, MF653Cdw, MF652CwLaser
Print a test or status page
- Load paper of the size/type the machine shows.
- Select <Menu> > <Output Report> > <Print List>.
- Select <User Data List> (or <System Manager Data List>) - or <Consumables Status Report>.
- Check that the paper size and type displayed is loaded and select <Start>.
Source: Printing Reports and Lists - imageCLASS MF656Cdw / MF654Cdw / MF653Cdw / MF652Cw User's Guide (oip.manual.canon). Last checked .
Print quality report
- Make sure enough toner remains and no documents are waiting to print.
- Load plain A4 or Letter paper in the paper drawer or manual feed slot.
- Select <Menu> on the Home screen, then <Adjustment/Maintenance> > <Maintenance> > <Clean Fixing Assembly>.
- Confirm the displayed paper size/type and select <OK>, then <Start>; a blank sheet is ejected when cleaning finishes.
- Press the Home key when the completion message appears.
Source: Cleaning the Fixing Assembly - imageCLASS MF656Cdw / MF654Cdw / MF653Cdw / MF652Cw User's Guide (oip.manual.canon). Last checked .
Cleaning
- Make sure no documents are waiting to print.
- Select <Menu> on the Home screen, then <Adjustment/Maintenance> > <Maintenance> > <Clean ITB>.
- Select <Start>; press the Home key when the completion message appears.
Source: Cleaning the Transfer Belt (ITB) - imageCLASS MF656Cdw / MF654Cdw / MF653Cdw / MF652Cw User's Guide (oip.manual.canon). Last checked .
Alignment
- Select <Menu> on the Home screen.
- Select <Adjustment/Maintenance> > <Adjust Image Quality> > <Correct Print Color Mismatch>.
- Select <Start>; the adjustment runs.
Source: Correcting "Print Color Mismatch" - imageCLASS MF656Cdw / MF654Cdw / MF653Cdw / MF652Cw User's Guide (oip.manual.canon). Last checked .
Not listed here: nozzle check. We could not confirm these steps in an official source for this family, so check your printer’s manual.
Note: Gradation calibration: <Menu> > <Adjustment/Maintenance> > <Adjust Image Quality> > <Auto Adjust Gradation> > <Quick Adjust> or <Full Adjust> (Full Adjust prints two adjustment images that are scanned face down on the platen, black stripe toward the back). Canon warns frequent calibration may affect toner cartridge life. Source: https://oip.manual.canon/USRMA-6621-zz-SSM-650-enUS/contents/devu-mainte-ajst_imaqua-gradation.html. Clean the fixing assembly after replacing a toner cartridge or if black streaks appear.
imageCLASS LBP6230dwLBP6230dwLaser
Print a test or status page
- Load Letter-size paper in the multi-purpose tray or manual feed slot.
- Press and hold the Paper key for 3 seconds; a partial network settings list (IPv4, MAC address, wired/wireless LAN) prints.
- For a full list, use the Printer Status Window on the computer: [Options] > [Utility] > [Network Status Print] (or [Configuration Page Print]) > [OK].
Source: Viewing Network Settings - Canon - imageCLASS LBP6230dw (oip.manual.canon). Last checked .
Print quality report
- Make sure no documents are waiting to print.
- Load plain Letter-size paper in the multi-purpose tray or manual feed slot.
- Click the machine's icon in the system tray to open the Printer Status Window.
- Select [Options] > [Utility] > [Cleaning], then click [OK].
- Wait about 90 seconds until the paper is fully ejected; cleaning cannot be cancelled once started.
Source: Cleaning the Machine - Canon - imageCLASS LBP6230dw (oip.manual.canon). Last checked .
Not listed here: nozzle check, cleaning, alignment. We could not confirm these steps in an official source for this family, so check your printer’s manual.
Note: Fixing unit cleaning can also be started from the [Utility Menu] page of the Remote UI.
How do I print a Canon settings or network page?
PIXMA and MegaTank models print a network settings page from the control panel or a button, such as the Information button on the TS3500 or the Wi-Fi button on the G3000. imageCLASS lasers print a user data list or configuration report. Use it to confirm the printer works and to read its network address if documents stop printing after a router change.
How do I print a Canon nozzle check pattern?
All the PIXMA families in our list print the nozzle check from the control panel or Canon’s printer utility. Canon’s manuals say a pattern with missing lines or white streaks needs cleaning. Compare yours using our nozzle check reader.
Canon cleaning, deep cleaning and ink flush
Canon’s sequence is consistent across the manuals we read: clean, check, clean again, then deep clean. If deep cleaning fails, turn the printer off and wait 24 hours before deep cleaning again. MegaTank models add an ink flush (system cleaning on the G3000) as a last resort that uses a very large amount of ink.
What Canon’s manuals say about cleaning limits
- PIXMA TS3500: print nozzle check, clean, re-check; if not resolved after doing steps 1-3 twice, deep clean; if still not resolved, turn off the power and deep clean again after 24 hours; then replace the FINE cartridge; then contact a Canon service center.Source on ij.manual.canon, checked Oct 12, 2026
- PIXMA TS3500 troubleshooting: clean, clean again, deep clean; if no improvement turn off the printer for more than 24 hours without disconnecting the power plug, then deep clean again. If not resolved after deep cleaning twice, the print head may be damaged or out of ink - replace the FINE cartridge.Source on ij.manual.canon, checked Oct 12, 2026
- Only clean when the nozzle check shows missing lines or horizontal white streaks, because cleaning consumes ink; if the problem persists after cleaning twice, perform deep cleaning.Source on ij.manual.canon, checked Oct 12, 2026
- MegaTank G3060 series: repeat nozzle check + cleaning twice, then deep clean; if not resolved turn off the power and deep clean again after 24 hours; if still not resolved perform Ink Flush, which consumes a great amount of ink (takes about 5 to 6 minutes).Source on ij.manual.canon, checked Oct 12, 2026
- MegaTank G3060 series troubleshooting: two cleanings, then deep cleaning; if no improvement turn off the printer and wait more than 24 hours, deep clean again, then perform ink flush. If ink flush does not improve the nozzle check, replacing the print head may resolve the issue.Source on ij.manual.canon, checked Oct 12, 2026
- MegaTank Ink Flush: running it when remaining ink is insufficient may damage the printer - refill any color below the single dot first, and check the maintenance cartridge has free space (otherwise ink flush cannot be performed). G3060 series: about 5 to 6 minutes.Source on ij.manual.canon, checked Oct 12, 2026
- MegaTank G6000 series Ink Flush takes approximately 8 minutes and uses a large amount of ink; refill any color below the single dot before starting.Source on ij.manual.canon, checked Oct 12, 2026
- MegaTank G6000 series troubleshooting: clean twice, deep clean, then wait more than 24 hours without unplugging the power supply, deep clean again, then ink flush; if ink flush does not help, replacing the print head may resolve the issue.Source on ij.manual.canon, checked Oct 12, 2026
- MegaTank G3000 series (computer): Deep Cleaning when two Cleaning attempts fail; System Cleaning if Deep Cleaning does not help (consumes an extremely large amount of ink; insufficient ink may trigger a failure); if no improvement, turn off the printer, wait 24 hours, and perform Deep Cleaning again.Source on ij.manual.canon, checked Oct 12, 2026
- PIXMA MX920 series: if not resolved after cleaning the print head twice, deep clean; if still not resolved, turn off the power (do not disconnect the power plug) and deep clean again after 24 hours; if still not resolved, the print head may be damaged - contact the service center.Source on ij.manual.canon, checked Oct 12, 2026
- PIXMA MG3600 series: after doing nozzle check + cleaning twice, deep clean; if not resolved turn off the power and deep clean again after 24 hours (do not unplug the power cord); then replace the FINE cartridge; then contact the service center.Source on ij.manual.canon, checked Oct 12, 2026
- PRO-200 series deep cleaning: if a particular color still does not print properly replace that ink tank; if not resolved turn off the power and deep clean again after 24 hours; if still not resolved the print head may be damaged - contact a Canon service center.Source on ij.manual.canon, checked Oct 12, 2026
- imageCLASS color (MF656Cdw): frequent calibration may affect the lifetime of toner cartridges; calibrating with low toner may disrupt color balance.Source on oip.manual.canon, checked Oct 12, 2026
Canon imageCLASS cleaning and quality
Canon’s laser models in our list have fixing assembly cleaning, and the color MF656Cdw adds belt cleaning and color correction. Canon notes that calibrating too often can affect toner cartridge life.
How do I align a Canon print head?
Print head alignment is in the same maintenance menu. Run it after a complete nozzle check, then confirm with our alignment test page.
Sources and what we could not verify
Every procedure above links to the Canon manual or support page it came from. We publish only steps we could read in an official source. See how we verify.
General Canon sources (13)
- Canon Inkjet Manuals (ij.manual.canon) - TS3500 series Online Manual (ij.manual.canon, checked Oct 12, 2026)
- Canon Inkjet Manuals - TS6400 series Online Manual (ij.manual.canon, checked Oct 12, 2026)
- Canon PIXMA Manuals - TS8300 series Online Manual (ij.manual.canon, checked Oct 12, 2026)
- Canon PIXMA Manuals - MG3600 series Online Manual (ij.manual.canon, checked Oct 12, 2026)
- Canon PIXMA Manuals - MX920 series Online Manual (ij.manual.canon, checked Oct 12, 2026)
- Canon Inkjet Manuals - G3060 series Online Manual (ij.manual.canon, checked Oct 12, 2026)
- Canon Inkjet Manuals - G6000 series Online Manual (ij.manual.canon, checked Oct 12, 2026)
- Canon PIXMA Manuals - G3000 series Online Manual (ij.manual.canon, checked Oct 12, 2026)
- Canon imagePROGRAF Manuals - PRO-200 series Online Manual (ij.manual.canon, checked Oct 12, 2026)
- Canon PIXMA Manuals - PRO-100S series Online Manual (ij.manual.canon, checked Oct 12, 2026)
- Canon - imageCLASS MF449dw / MF448dw / MF445dw - User's Guide (oip.manual.canon, checked Oct 12, 2026)
- Canon - imageCLASS MF656Cdw / MF654Cdw / MF653Cdw / MF652Cw - User's Guide (oip.manual.canon, checked Oct 12, 2026)
- Canon - imageCLASS LBP6230dw - User's Guide (oip.manual.canon, checked Oct 12, 2026)
Not yet verified (9)
- PIXMA TS9500 series (TS9520) - not fetched.
- PIXMA PRO-100 (original), PRO-10 and PRO-1000 panel procedures - not fetched; only PRO-100S and PRO-200 verified.
- PIXMA MegaTank G2000 series (G2200 etc.) - not fetched.
- PIXMA MegaTank G7000 series (G7020) nozzle check, cleaning, alignment, ink flush pages - only the deep cleaning page was fetched.
- A dedicated 'System Cleaning' name on G3060/G6000 series - these manuals call the equivalent function 'Ink Flush'; 'System Cleaning' appears only in the G3000 series driver manual.
- A printable test page / network list for PRO-100S - not found.
- Explicit list of individual models in the MX920 series and PRO-200 series manual top pages (MX922 alias assumed from series naming).
- imageCLASS MF445dw print quality/calibration report beyond Clean Fixing Assembly - not found.
- Canon USA knowledge-base articles (support.usa.canon.com) - pages failed to render via fetch, so none are cited.
Questions people ask
How do I print a test page on a Canon printer?
Canon PIXMA models print a network or settings information page from the control panel, and imageCLASS lasers print a user data list or settings report. These confirm the printer works. For quality, run the nozzle check or print our color test page.
How do I read a Canon nozzle check pattern?
Canon’s pattern has a line section and color blocks. Missing lines or horizontal white streaks mean a clog. If the pattern is complete, cleaning is not needed. Canon’s manuals say to clean only when the pattern shows a problem, because cleaning uses ink.
What is Canon deep cleaning?
A stronger cleaning that uses more ink. Canon’s manuals we checked say to run it after two normal cleanings fail, and if it still does not help, to turn the printer off (without unplugging it) and deep clean again after 24 hours.
Is there a Canon PIXMA test page?
Yes. Use the color test page above for print quality, and the nozzle check from your PIXMA’s menu for clogs. The model list shows both for each PIXMA family we verified.